Sunday, February 24, 2013

Circle Wedge Tree Skirt, Part 2

Click here for Part 1 of the Circle Wedge Tree Skirt. 

Cutting the Wedges. You need to cut at least 8 wedges from each of your strip sets to obtain the correct number of wedges for the tree skirt. You need 40 wedges to create one tree skirt.

If you're using a 10-degree wedge ruler, you'll need 36 wedges, which means you'll have 4 wedges left over. Extra wedges can be set aside for later use in a scrappy tree skirt.

Place the circle wedge ruler on your first strip set with the narrow end at the top of your strips. This is an "up cut". All the up cuts will be used to make Tree Skirt #1.

Align the 45 degree marking on your ruler with one of the seams in your strip set. Slide the ruler as close to the end of your strip set as you can, and make sure your fabric strips extend beyond the upper and lower edges of your ruler.

Every time you make an up cut, you'll need to place the ruler in the same position on all 10 strip sets. You might want to make yourself a note as a reminder.
 
If you are unable to place the 45 degree marking of your ruler on a seam line, align the 45 degree mark parallel to one of your seams. Then place a piece of painter's tape along one of the seam lines and make a note to yourself where to line up the tape on the next cut. Remember, every up cut must be cut the same way.
 
After you have cut the first wedge, flip the ruler around so that the narrow end is at the bottom of the strip set. This is a "down cut". Again, align the 45 degree marking on the ruler with one of the seam lines in the strip set. The long edge of your ruler may or may not line up with the edge of the wedge you just cut. It is more important to have the 45 line on one of your seam lines or parallel to one of them.  

Make a note of the placement if necessary so you can repeat the exact placement on all 10 strip sets.

All the down cuts will be used to make Tree Skirt #2.

Continue cutting wedges from your strip sets, flipping the ruler after every cut. You should have at least 4 up cuts and 4 down cuts.

If you are able to cut 9 wedges from your strip sets, you can use the extra wedges from several different strip sets to make a scrappy tree skirt.


Up Cut and Down Cut

Using either the up cut wedges or the down cut wedges, start sewing wedges together in pairs, matching the top and bottom edges of the wedges. No other matching of seams is required along the length of the seam. Remember these are bias edges, so place as many pins as necessary along the seam line.

Continue sewing pairs of strips together until all 40 wedges are sewn together in a circle. Do not sew the last two wedges together because you'll need an opening to go around your Christmas tree. 

Press all of your seams in one direction. Press (up and down), don't iron (back and forth)!

Now make your second tree skirt. 

Quilting. I used a regular weight batting for my tree skirt, probably Warm and Natural, but you could use a thinner batting, like Thermore or Pellon fleece, or maybe even a flannel if you wanted. If you plan to quilt your tree skirt yourself on a domestic sewing machine, quilting in the ditch will suffice. You'll want to use a walking foot. You can start by quilting in the ditch every 5 or 6 wedges to secure the layers, then go back and quilt in the ditch along every seam line. I have a long arm, and I loaded my skirt on a square backing and used a pantograph to quilt my skirt. 

Binding.  Because the outer edge of your tree skirt is a curved edge, you must use a bias binding. According to the original directions that I had, about a yard of binding is required for one tree skirt. I did not add ties to my skirt; but if you wanted to, you could use extra binding or ribbon.There is a good tutorial illustrating a method for cutting bias binding strips here.

Circle Wedge Tree Skirt, Part 1

We're having another snowstorm today, with another 8-12 inches of wet, heavy snow predicted.  A perfect day to be inside quilting, knitting, and blogging.

I've hardly sewed at all the last week or two, so virtually no progress has been made on my Easy Street mystery. I'm too busy taking classes at my local yarn shop. Homework is required, so I've been very busy knitting--a scarf, a shawlette, a vest, an intarsia pillow, and a pair of socks. I decided to give two socks on two circulars another try, and I'm liking it much better.

Late last year several readers asked where they could find the pattern for the Christmas tree skirts I made for my two sons for Christmas. I took that class online at Quilt University, and one of the readers told me that the woman who authored those lessons passed away. I contacted Carol Miller, owner of QU, and was told that Nyla Morrison did indeed pass away four or five years ago. Because the Fingers of Fire Tree Skirt class is no longer offered at QU, I asked for and received permission to write a blog tutorial for those who were interested.

Circle Wedge Tree Skirt


*** Please read all of the instructions for Parts 1 and 2 before you begin.

These instructions will produce two 50" tree skirts with the fabric order reversed in the second skirt. In the example at left, the white fabric is in the center of one skirt, and the same fabric appears around the outer edge of the second skirt. 

Supplies. The only item required for construction of the tree skirts, other than your normal sewing items, is a 9- or 10-degree circle wedge ruler in a 25" length. 

You can buy a 9-degree ruler directly from Marilyn Doheny, the inventor of the ruler:
http://dohenypublications.mybigcommerce.com/25-9-degree-circle-wedge-ruler/
Amazon also has them.
http://www.amazon.com/25-Degree-Circle-Wedge-Ruler/dp/B005MGUHXM
I think Amazon also has the 10-degree rulers, and I believe they're less expensive than the 9-degree rulers. 

The directions are the same for either ruler.  

These rulers used to be made by Omnigrid, so my ruler will look a little different from yours, if you have to purchase a new one. 

You will probably have to add sandpaper dots, felt dots, True Grips or something similar to the underside of your ruler to keep it from sliding around when you're cutting out the wedges. True Grips work better than anything else I've tried. If you're unable to find them in your LQS, you can buy them here.

You may also need a walking foot if you plan to quilt your skirt on a domestic sewing machine. 


Choosing Fabric. You can use 6 to 10 fabrics in your tree skirt. I used 9 in the tree skirts I've made. You can use all different fabrics or you can repeat one or more if you wish. Tone on tones and small prints seem to work better than large scale prints. In this photo, I used a medium scale floral with red flowers and white flowers. It appears in the middle of the wedges. I like it, but I wouldn't use a print larger than this. You can decide if you like the effect or if you'd prefer to stick with a smaller scale print. 

I also added a stripe to my fabric set because I thought it was interesting. You can also use washable satin or gold lame, but you might have to back any specialty fabrics with fusible interfacing. 


Yardages and Cutting Requirements. Once you've selected your fabrics, you'll need to choose the order in which they appear in your tree skirt. I found it very helpful to make a fabric layout chart with small pieces of my fabrics taped to a sheet of paper. Next to the fabrics, I annotated how wide to cut my strips. 

You will be cutting 10 identical strips from each of your fabrics, and you'll be sewing 10 identical strip sets. You can choose what widths you'd like to cut your strips, but the width of your strip set must measure at least 19" finished.  

Here are the measurements I used for my tree skirt. If you change the number of fabrics used or the widths of any of the strips from my set of measurements, you will need to recalculate your yardages.

Fabric #1:  3-1/2" finished, cut 10 strips 4" wide, 1-1/4 yard required
Fabric #2:  2" finished, cut 10 strips 2-1/2" wide, 3/4 yard required  
Fabric #3:  1-1/2" finished, cut 10 strips 2" wide, 2/3 yard required
Fabric #4:  1-1/2" finished, cut 10 strips 2" wide, 2/3 yard required
Fabric #5:  2-1/2" finished, cut 10 strips 3" wide, 1 yard required
Fabric #6:  1-1/2" finished, cut 10 strips 2" wide, 2/3 yard required
Fabric #7:  1-1/2" finished, cut 10 strips 2" wide, 2/3 yard required
Fabric #8   2" finished, cut 10 strips 2-1/2" wide, 3/4 yard required
Fabric #9:  3-1/2" finished, cut 10 strips 4" wide, 1-1/4 yard required

In my chart, notice that the total of all the "finished" measurements adds up to 19-1/2", which is fine. Remember, the strip set must measure at least 19" finished. 

The yardage requirements assume a fabric width of 42" across the bolt. If your strips are 40" or shorter, you may need to piece some of your strips to get the correct length. My suggestion is to cut and sew one strip set first and cut out the wedges to see if your strips will be long enough. 

Making the Strip Sets.  To make a strip set, fold one end of your first strip at a 45 degree angle. Place your second strip right sides together, aligning the top edge of Strip 2 with the bottom of the folded end of Strip 1, and sew the length of the seam.

Fold over the top end of Strip 2, add Strip 3 right sides together, and sew the seam. 

Continue adding the remaining strips in the same manner, remembering to fold each of the preceding ends at a 45 degree angle. Because the circle wedge ruler is placed at an angle on the strip sets, staggering the strips in this manner conserves fabric.

Press all the seams in the same direction. Ensure that each strip is pressed out completely and that you don't have a small fold next to the seams. 

Once you have completed your first strip set, make 9 more exactly like the first.   

Click here for Part 2 of the Circle Wedge Tree Skirt.


Monday, February 11, 2013

Still On Easy Street

We had a doozie of a blizzard over the weekend. It started snowing very early Friday morning and finally wound down about 4:00 Saturday afternoon. Hubby was released at noontime on Friday, so he got home before the worst of the storm hit. I was surprised we never lost power, even with 40 mph winds throughout the storm.  

Today was Monday Sew Day, and the girls came over but didn't stay past lunch time. It started snowing a little before noon, so they were anxious to get home. We wound up getting another two inches of heavy, wet snow on top of the 2 feet or whatever it was from the blizzard. Then Mother Nature topped it all off with a little freezing rain.

I finished a couple more blocks for the Easy Street quilt. That's 5 blocks done, and only 20 more to go! I've had all the block units and setting triangles made since the mystery ended, but I'm taking my time building the blocks because I'm busy with other things. 
Bonnie Hunter has a new mystery quilt called Lazy Sunday starting in the latest issue of Quiltmaker magazine that colors similar to Easy Street, with the addition of hot pink and orange. I've already pulled fabric for it and hope to get started some time in the next couple weeks. I'm glad the next issue isn't for two months.

The last of the 6 little jelly roll quilts got done over the weekend. I was glad to get them out of my hair, but I might pick up some more to do on Wednesday.

I've also been doing a lot of knitting since the beginning of the year. Last August a new yarn shop called Hook Yarn and Stitcher opened in the next town over, and I've been a frequent visitor. I am working on this entrelac scarf from a class I took there. This is an interesting technique to work with, but it took a while to get the hang of it. I ripped it out a bunch of times before I finally got it. I bought 4 skeins of yarn to make a 60" scarf, so I have quite a ways to go. There are no color changes in the scarf, that's just the way the variegated yarn is working up.

Tomorrow I begin a shawlette class, which I'll be giving to my daughter-in-law for her birthday. It has a lace edging which I haven't done before, and I'll learn how to read a chart. More learning opportunities.

Thursday, January 24, 2013

A Lucky Day

It was -5 degrees this morning when I woke up at 7 o'clock. We experienced a week or so of the so-called January thaw; and now we are in an arctic freeze, probably for another week or so. Last night the wind chill was 25 below. It simply takes your breath away.

I had a great day yesterday, went to a workshop for quilt group; but first, a little catching up. We had a good Christmas because both my sons were home; but they were both in and out, which made for a hectic couple of weeks in December. After Christmas, my older son had to go back down to New York to work two days, then he was back up to Maine until New Year's Eve. My younger son was here for Christmas, then left for Boston in the middle of a snowstorm so he could catch a flight to Dublin, Ireland. He finally came home Jan 8 and stayed with us another day.

I spent most of November and the first half of December planning the Christmas party for our quilt group. My co-planner Koleen spent much of her time shopping for items for gift bags, game prize bags, and accessory items for the party. I spent most of my time machine embroidering 37 candy cane holders, one for each member's gift bag, and we stuck pencils in them instead of candy canes. The pattern for these came from Embroidery Library. Both of us also made quite a few baked items to fill the giftie bags.

Koleen planned a couple of Q & A games, and I worked out a Bingo game, where each player had a blank bingo card and a list of holiday related words, which they used to create their own unique bingo card. Each player also received a small baggie filled with red and green M&M's that they used for the markers.

We had a potluck meal, so there were lots of good things to eat at the party. All in all, I thought the party was a great success, but I was exhausted by the time it was all over, and I dragged through the rest of December trying to finish getting ready for our own holiday. In November I finished a tree skirt for my older boy, and my husband took that down to New York with him for delivery, but I never got the second one done for my younger son until January. Had it quilted, but never got the binding on. It didn't matter though, because my son was too busy with college finals before Christmas and never got a tree, then he was off to Ireland.


Here's the second tree skirt before it was quilted and bound...


 ... and here's the quilting on the back after it was finished. I used a holly berry and leaves design from Lorien Quilting.

The hexagon blocks got put on hold again because I had so many other things to do, and I haven't been able to get going with them again. I think I'm about 6 or 7 behind now. This is the last one I got finished, Hexie #54. I suppose it's a little boring, but it looked good to me when I started it.  Maybe you need a few toned down ones to focus some attention on the more interesting ones.

The only other sewing I really did over the holidays was Bonnie Hunter's Easy Street mystery quilt.  I finished building all of the block components, assembled the four corner units for the quilt, and got 4 of 12 setting triangles done. Hope to get back to it this week.


Yesterday was a workshop at my quilt group, Tacoma Lakes Quilters. Before we got started, we had the Mini-Raffle, which is a small fundraiser we've been doing for the last year and a half. Members donate items throughout the year, then we sell raffle tickets for a dollar a ticket. It's been quite successful and a whole lot of fun.

I really liked this little pincushion with the matching lamp that was for the raffle yesterday, and I was absolutely delighted when I won it. My good friend Barb made the pincushion, which has little pockets round the outside to hold spools of thread. The gray cording is fed through the holes of each of the spools to keep them in place.
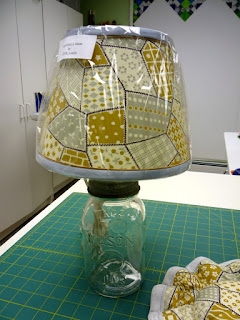
Then, with the same fabric, she had a shade made for a small Mason jar lamp, which is now filled with buttons and residing in my sewing room. I love, love, love this set!


For our workshop yesterday, we did a Jelly Roll race. If you google it, you can find videos on YouTube for the way this works, but the general idea is to take the strips in a jelly roll and sew them end to end as if you were making a very long binding strip. Then you find the midway point of that long strip, cut it in half and sew the long edges together. You repeat that process until the quilt is the size you want.

A jelly roll typically contains about 40 strips. We used only 10 strips for each little quilt and wound up with about 30 quilts in just a few hours. The remaining kits that weren't sewn up were dispatched to folks who will take them home and finish them. Once they're all quilted and bound, they'll be donated to nursing homes and assisted living facilities locally. Their small size makes them just right for folks in wheelchairs.

Because it was a timed race, prizes were awarded to the first three contestants who completed a top, and one prize for the person in last place. I finished in second place and won this gift bag, comprised of paper and pen, candy, a pack of Kleenex, tiny candles that look like chocolates, a candle holder, and a heart shaped plaque with a cute saying on it. My favorite stuff. How come quilters like office supplies and candy so much?

Tuesday, January 1, 2013

Friday, November 30, 2012

Easy Street Part 1

The last thing I should be doing right now is starting another quilt, but when I saw the colors Bonnie Hunter was using in her mystery quilt this year, I said to heck with it and jumped right in. I rarely use lime greens, cool aquas, and purples in my quilts, but I have plenty of them. Don't ask me why--I don't know--but this is a fine time to use them. I think this combination of colors, plus the gray and the black and whites, is spectacular.

I've wanted to make a black and white quilt for years, and I recently acquired a couple of large scrap bags from an auction that contained a lovely collection of black and white scraps, so I only had to buy a couple yards of gray, and that's it. All the rest came from the stash.
 
192 four-patch units are required to complete Part 1 of the Easy Street mystery, and so far I've made 100. I didn't decide immediately that I was going to start the mystery, so I lost a couple of days. Part 2 will be released tomorrow, so I'll try to get all caught up by the time Part 3 is released.

The weather has turned much colder in Maine. The low tonight is supposed to be 14 degrees, 12 degrees tomorrow night. Wonder when we're going to get some snow.

Thursday, November 29, 2012

November Finish

Ten years ago I took a class at quiltuniversity.com called Fingers of Fire Tree Skirt, taught by Nyla Morrison. The tree skirt on the right, which is folded in half, was the result from that class. I sewed and cut wedges for a second tree skirt at the same time, but I never put them together. A month or so ago, I hauled them out and finished the second skirt for one of my sons. I finished sewing the binding on yesterday about three hours before my husband left with it for New York where my son is living, so I didn't get a photo of the skirt quilted and bound.

These tree skirts are so easy to make. I made 10 strip sets of 9 fabrics, then used a 9 degree ruler to cut out the wedges. The wedges are then sewn edge to edge--nothing to match. 40 wedges make a circle.

To make the best use of the fabric, the ruler is flip flopped down the length of the strip set as the wedges are cut, so you get enough wedges for two tree skirts, only the sequence of colors is reversed on the two skirts.

One of the two skirts from this new set of wedges will be for my other son.


These are the selvages from a couple of the Christmas fabrics I bought. So many quilters are saving their selvages now, and I had heard that at least one fabric manufacturer started to use some different designs on the edges instead of the usual color dots, but I hadn't seen any until I found these two fabrics. Love the selvage on the "Winter Elegance" fabric. A selvage quilt is on my list for next year.