Tuesday, February 19, 2019

The Puff Quilt... and a Finish!

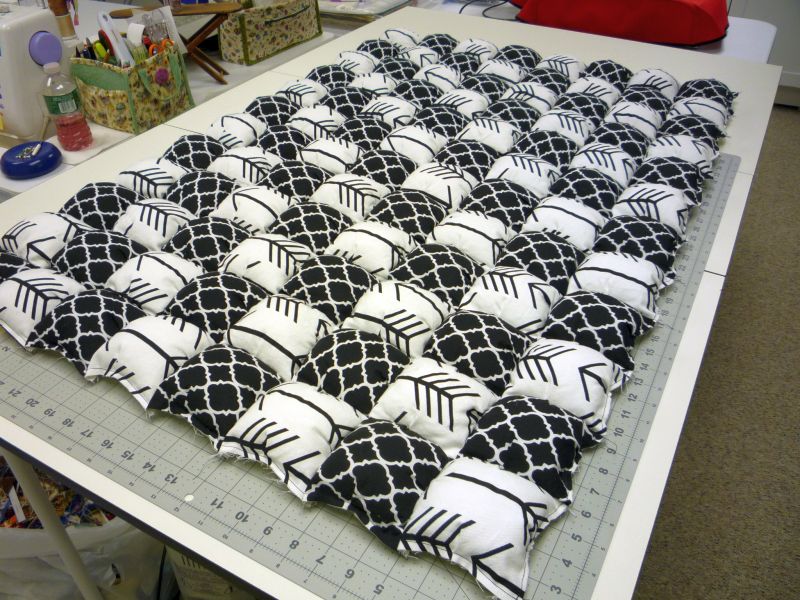
Making the puff quilt was not as difficult as I anticipated, and I'm documenting the process here, not only for some other soul who might take the challenge, but mostly because I don't want to forget how I did it. I figured out a few tricks of my own beyond what I saw in YouTube videos.

For someone who really was learning how to sew for the first time, DIL did extremely well with the process. And what a taskmaster! We decided to make the quilt 12 x 12 puffs or 144 puffs. I cut while she sewed, and we sewed up all but 24 squares on Saturday and finished the rest on Sunday. I was exhausted Saturday night when we finally quit.

We used 4-1/2" muslin squares for the bottom, and 5" squares of focus fabric for the top of each puff. Squares were sewn on three sides with a 1/4" seam allowance, leaving one side open for stuffing.

Because the top square was larger than the bottom square, it was necessary to sew a pleat into the top square. We eyeballed this so the pleat was approximately centered on the square.

Once all the squares were made, we sewed 12 squares together to make each row.

At this point the squares were not stuffed. I tried sewing two stuffed rows together and oh, what a chore that was. It was so much easier to sew an unstuffed row to a stuffed row, then fill it with the fiberfill and sew the squares in the whole row closed.

I also discovered that if I sewed the row closed with an 1/8" seam allowance, then I didn't have to worry about a line of thread showing on the top after the rows were sewn together. When I added the next unstuffed row, I used a 1/4" seam allowance.

I took 9 rows home with me to work on because DIL wasn't sure how much she'd be able to get done on her own. She actually got her 3 rows all done a day or so later. I finished mine last week.

I very much like DIL's fabric choices. She has another piece for the backing with black skeleton heads on a white background that I think will be really cool.

I also finished the binding on this string quilt last week. This is a rather strange quilt to me, but I took a liking to it and wanted to make it. It is from a book called Small Pieces, Spectacular Quilts by Biz Storms and Mary Elizabeth Kinch. They called it "Go With the Flow", I call mine "Heartstrings". There are some insane quilts in this book, but there are a couple others I'd make.

The blocks finish to 12", and they are composed of vertical bars of varying widths. One of the blocks has 5 vertical bars, the rest have 4 or less. My friend Koleen, who passed away in 2017, was making 4" x 8" sections of string blocks for a quilt of her own design at the time. I had about 6 of those blocks plus all the string sections she'd made; and I tried to love them... but I didn't.

When I found this pattern and decided to make it, I took Koleen's string blocks and worked them into my 12" blocks. Every last piece of Koleen's string blocks was incorporated, even if it meant taking the smallest leftover strip and using it as a string itself. These blocks are so busy you really have to hunt to find these string-pieced strings.

Done!
I also turned out a new batch of soap last week, a small one-pound batch. I realized that if I kept making 2- and 3-pound batches, not only would I quickly run out of storage space, but I'd never be able to use it all up. This batch got too thick before I had a chance to try and swirl it, but I still like how it turned out. I'm not much good at swirling anyway, but I keep trying, lol.

The colors are not quite true in the photo--the purple is brighter, and the white is whiter. I scented it with lavender and chamomile. I hadn't used chamomile before, didn't really care for the scent, but it's very intriguing blended with the lavender. Chamomile essential oil is pretty expensive, but I'll use it again.

Saturday, February 9, 2019

Yankee Puzzle

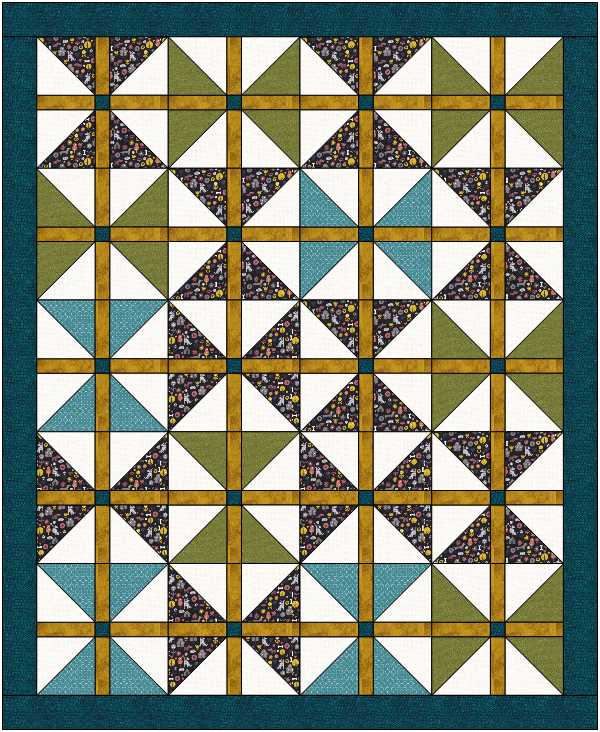
I spent most of Tuesday and Wednesday cutting and kitting up fabric for this Yankee Puzzle quilt. This picture is an image from EQ8, but I do have one made up. My quilt chapter is very charity minded, so we are having a workshop next month to make 10 of these quilts to donate to a local area veterans' shelter. The chapter paid for all of the materials for these quilts; so several of us washed, ironed, and cut fabric for the kits. I think a few chapter members will also make their own quilts, so hopefully we'll have more than 10 finished quilts.

For those who are interested, the designer wrote instructions to construct the quilt and made a series of step-by-step videos detailing each step. That post is here.

This was my chapter's raffle quilt from our show this past October. It's called Scrap Crystals, designed by Bonnie Hunter. (Yes, we got permission to use it as a raffle quilt.) My dear friend Koleen passed away in July 2017 from cancer, and one of the things she told us before she died was that she wanted Tacoma to have this quilt for our raffle quilt. At that point it was still just a top, so one of our members quilted it, I bound it, and it became part of our October 2018 quilt show. We earned over a thousand dollars from ticket sales from Koleen's quilt, half of which we just spent for the Yankee Puzzle kits.

The winner of the raffle quilt heard the story about Koleen and gave the quilt back to us because he thought one of our members should have it. We again raffled the quilt, internally, and awarded it to one of our members. From that second raffle, we earned  $760. Thursday five of us made a trip to the Harold Alfond Center for Cancer Care in Augusta to donate those funds, to be used for cancer patients within our own communities. I think Koleen would have been very pleased.

I bought this puff quilt for my granddaughter and her brother for Christmas 2017. This is one of those things that I never had a desire to make and was more than happy to pay someone else to do it, swore I'd never make one. About two weeks ago, dear DIL, who is not a quilter, in fact can barely thread a needle, decided she wanted to make one of these things. So! I hunted down a YouTube video detailing the process, and I will be spending the day today helping her put this together....

I'm taking this cute little apron down with me today for my granddaughter. It's vinyl-coated fabric, not stiff at all, so just a quick wipe to clean it up. One of my friends actually made it for one of her great grandchildren; but it was too small, so she gave it to me. What I absolutely love about it is that there are casings on the sides, so you can adjust the size of the tie around the neck. Brilliant!

Baby Girl has always loved to put things in my shirt pockets, so I wanted to make her an apron but never got around to it. Problem solved! She's two and a half, so I think it will fit her just fine. Barbara gave me the leftover fabric from the apron, so I added the pockets after the fact.

Tuesday, February 5, 2019

It's A New Year...

... and migosh, it's already February. Time moves so quickly these days. Last year was an extraordinarily busy year for me. Staying busy with the family accounts for much of that time, but I also worked two quilt shows during the summer and fall, and then the holidays. There simply are not enough hours in the day.

And soapmaking. I spend more time reading about soap than I do about quilting. I took a couple of adult ed classes in January and February last year and learned how to make cold process soap. I've been hooked ever since. I make it on a small scale for family and friends, and I really like experimenting with all the different ingredients you can add to soap. I've added body butters and lotions to my repertoire, and my extremely dry skin is so much better for it this winter.

This past Christmas, my son indicated he wanted to learn; so I bought him all the tools and some reference material; and he's as hooked as I am. Now my daughter-in-law has gotten in on the act, and my younger son told me yesterday he wants to learn too. I'm lovin' it.

This is a lovely batch of orange-scented soap with some marigold petals on top that I cut last week. I'm anxious to use it, and I wish I didn't have to wait for it to cure for four weeks. 

I managed to finish 12 quilts last year, some of which were in the works for quite a while. All of the ones featured in the last post, which was from May of last year, were completed. Nothing like commitment to display at a quilt show to motivate, and here are the others I finished last year.


Jungle Blooms was my first effort making a One Block Wonder quilt, from Maxine Rosenthal's book of the same name. I really enjoyed making this, and I absolutely love how it turned out. Can't wait to make another one. The cutting and piecing are not difficult, and moving the blocks around to create a design was absorbing.

I quilted it with something that looked like a palm frond, which I thought appropriate for the theme.


I was very happy indeed to finish Twisted Ribbons. I don't know how many times I blogged about it, and it dragged on and on. Decided it was time to knuckle down and get it finished, and it went in our chapter show in October.


Farm Girl Sampler from Lori Holt of Bee in my Bonnet was a fun quilt to make, but it definitely wasn't a quick quilt. All the blocks were made with rotary cutting instructions, no templates or applique; so some of them took a bit of time to make. I've already purchased Lori's newest book of sampler blocks, Vintage Christmas, and looking forward to getting started on that one.

Lori designed additional blocks that were not in the original quilt, so I subbed out the house for the cow block. There's a barn and a milking pail in the quilt, so I thought, why not?

I don't knit much anymore, but I was happy to include the sheep anyway.

I was also happy to see Lori included a spool block. The gingham plaid is cute enough to make a whole quilt with. Lori's book had quite a few other projects in it besides the sampler quilt, and blocks were all included in two sizes. There is so much you could do with these blocks.

This year will be another year with multiple charity quilts, and some golden oldies for a chapter UFO Challenge. This Quilt of Valor is from a kit that the state rep gave me to work on last October. The ribbon border was a pain but worth the effort. I've been trying to make time to get it loaded for quilting, but that hasn't happened yet... I've finished a few other tops that are also in the RTQ (ready to quilt) pile, and you'll see those eventually; but the Quilt of Valor is the next one I need to push to finish.

Thursday, May 31, 2018

Piling Up Tops

Hello everyone, I've been so busy quilting that I haven't had time to blog. Nah, not really, I'm just not a good blogger. There has been lots to do around the house and in the yard this spring, and we're spending what time we can with our little granddaughter.

Warmer weather has finally come to Maine--80 degrees today and tomorrow with more warm days in the forecast. I'm not much of a gardener, preferring plants that take care of themselves completely. I've posted photos of my hostas in summers past, and they are a perfect example. They have done such a good job of taking care of themselves that quite a few of them are at least 6 feet in diameter. And my ferns along the edge of the woods are over 3 feet tall.

This year I had a yearning for a few flowers, so I bought some marigolds, pansies, and a few herbs and cleared a place for them in the back yard. The flowers don't seem to be doing very well, but the herbs are doing fine. Now that the trees in the back yard have leafed out, lack of sun may be the problem. Forgot about that when I planted the flowers. Like I said, I'm not much of a gardener.

I also bought three mayapples. My mother in Maryland had bunches of them in the woods beside her house, and I always loved them. I didn't know if mayapples would grow this far north, so I was surprised to see some at the nursery this year. They are a shade plant; and two of them are flowering, so they must be happy in their new location. I noticed this afternoon that something is eating the leaves, so I'll have to get to the bottom of that and fast.

I have been quilting as much as I can, and I have managed to get a couple of finishes and a small stack of quilt tops added to the pile with Stella Blue. My quilt chapter has been making and donating small quilts to NICU for a couple of years now, so charity baby quilts are an ongoing thing. I finished another Bricks quilt for NICU...

... another Teddy On Vacation (made one just like this 7 or 8 years ago, and this was from the left overs), still just a top ...

... and two more Jumping for Joy quilts (made the first one a year and a half ago from an article in Quiltmaker magazine), which got loaded on the frame yesterday. I don't know why on earth I bought so much of this teddy bear fabric, but it makes for a nice baby boy quilt. Still have plenty more to use up.


I was very happy to get the Halloween Fun top finished. Found a pantograph that looks like a spider web that I plan to quilt it with. Might have to practice a little first. Just have to decide if I want to use a light gray thread or something else.

 My potholder quilt was finished a couple weeks ago. The potholder method of quilting was introduced to me a couple years ago in a workshop by Wendy Caton Reed sponsored by my quilt group. Wendy is an award winning local quilter and has been quilting with the potholder method for many years; and she also writes a blog here. She had a phenomenal trunk show before the workshop featuring many of her original designs.

I love everything about the potholder method. Each block is finished as a small quilt, quilted and bound; then blocks are handsewn together to make the quilt. You can start small, just by sewing four blocks together; and you can keep adding more blocks until you get to the size you wish. At every stage, you always have a finished quilt.

After the first workshop, I made the first four blocks of this one-block strippy, which hangs in a narrow space in my bathroom. It was a finished product, and it stayed like that for quite a while. We just had another workshop with Wendy, and I made two more little blocks and added those to the bottom. I think I'm done with it now.

 After the Halloween quilt top was finished, I needed another embroidery project to work on, so I started Baltimore Revisited, which is a design from Anita Goodesigns. There are 20 different blocks. Each block is stitched out both in redwork and in a colored filled in design, so 40 blocks total.

I spent two months trying to decide which size to make and exploring different methods of quilting the blocks. In the end I decided to make the smallest size block, which finishes to 5-3/4"--because I like little blocks. And I decided to make it in the potholder style. I just have the one block quilted and bound, and the second one is just waiting for the binding. And I'm loving it.

"Myron's Campfire", from one of the Civil War Legacies book, was the next little top I finished. It measures something like 17" x 19" and was a fun, quick little quilt to make. I already had the civil war repros out to make the one-block strippy potholder quilt, so I got this finished up too.

The last top I've managed to get done is another Strip Tease quilt. I made one of these a long time ago and had a bunch of strip sets left over. I have several one-patch projects lined up to get rid of scraps and fabric I don't love anymore, and this was one of them. These are all 45 degree diamonds. On my list of one-patch quilts I want to make are quilts with 60 degree diamonds, half hexagons, half square triangles, and tumblers.


Thursday, March 8, 2018

That's Progress

We are finally on the back end of last night's nor'easter, and I think we have a foot or so on the ground. Before last night, most of our snow had melted, which I was glad about. Now they are already talking about another potential nor'easter on Monday/Tuesday. It's really been a very strange winter here in Maine.
The weeks have really flown by, and progress has been made on several quilts. This one is Stella Blue, by Miss Rosie's Quilt Company, pieced by my dear good friend Koleen. I've mentioned Koleen once in a while on the blog. She passed away last July after a nine-year battle with cancer, and I miss her so much sometimes that my heart hurts. Koleen left most of the contents of her sewing room to our other dear good friend and me. As a consequence, I inherited this top, and I'll return it to Koleen's husband when it's finished. Up close, it's a gorgeous quilt.

Koleen pieced the middle of this top before she passed away, and she made the flying geese units but hadn't sewn them into border strips yet. I had a devil of a time adding them because her quarter inch seam was a less generous than mine, lol. But it's now ready for quilting.

Welcome Home, Baby was my February finish. I bought several packages of those Cake Mix triangle papers, which I think are very clever. I have become a big fan of creating half square triangle units with triangle papers. I usually print my own from the Inklingo software or Brenda Hennings' Triangulations software, but the cake mix recipes were something different and fun.

I also bought some Cupcake Mix papers, which make smaller quilts; and this quilt was made from a block design on the Cupcake Mix #1 package. I had two sets of the block panels, so I'll make another one of these at some point to use the other panel.

I have two pumpkins left to stitch out for my Halloween quilt, and then I can add the borders and toss it in the RTQ pile. Yay! I enjoy machine embroidered applique, but the prep takes time, so this has been a long slog.

And this is my One Block Wonder, an experiment from Maxine Rosenthal's book of the same name. The stack and whack quilt I finished in January was supposed to have been a workshop last year for my quilt chapter, but it was cancelled due to weather, so I made it on my own. The workshop did occur last month finally, but I wanted to try some other stack and whack project, so I dug this fabric (on the left side of the photo) out of the closet and decided to give it a try. Didn't think I'd like it, but actually, I love it.

I still need to shift a few blocks around along the left and right edges, but I've already started sewing vertical rows with the blocks in the middle of the quilt. Only half the hexagon block is sewn together, then vertical rows are sewn and joined so there are no inset seams.

All of these quilts were new projects, started within the last six months or so. When they're finished, I've GOT to get back to the UFO pile.

Tuesday, January 30, 2018

First Finishes for 2018

Last year was a dry year for me--only 6 finished quilts, my second worst year since I started keeping track in 2004. 2016 was my best year, with 18 finishes, and some of those were large quilts. I resist making New Year's resolutions; but I can do better, so I'm making two resolutions this
year--make time for more quilting and more blogging. I miss my blogging friends too. Housework will just have to suffer!

I finished Blue Palms for my son yesterday, so named because that was the name on the selvage. It is, of course, a Stack-n-Whack quilt from Bethany Reynolds' first book, Magic Stack-n-Whack Quilts. It's a big quilt--85" x 102"--so I was surprised that every hexagon block was very different.

My quilt group was supposed to have a Stack-n-Whack workshop last year; but something else came up for the instructor, so I went ahead on my own. She is slated to do the workshop for us next month, but I'm debating if I want to do another one right now. I'd like to try one of those One Block Wonder ones; so if I have something in the stash that will work, I might make a small one. Otherwise, I really don't need any more ufo's.

I had just enough of the original 6 yards to add a couple strips on the backing. Which was a really good plan, because I didn't have quite enough. I was never nuts about this fabric, but I was nuts about the colors, and I love how it looks in the hexagons.

And speaking of ufo's, I have over a hundred of them, in various stages of completion--sad, but true--so I go through my list once or twice a year and cull a few that I don't like anymore for one reason or another. This quilter's block case was one of them. I thought it was a great idea, but I wasn't happy with the way it was going together, so it landed in the ufo pile for several years.

I actually dug it out to disassemble it, but I got to looking at it and realized it was almost done, so I finished it. Now I'm glad I did. It's supposed to have a handle attached with grommets, and that may or may not get added. It unfolds completely flat, and it's large enough to hold a stack of 12-1/2" blocks. It's lined with flannel, so it's great to take to a workshop--the blocks stay where they belong in the case. I'd tell you the name of the pattern I used except I can't locate it right now. I think it was probably called Quilter's Block Case, but I couldn't locate it online either.

Update: the pattern is called Graham's Quilter's Block Case, GCC018 from the Graham Cracker Collection, grahamcrackercollection.com


The holidays were pretty crazy--a trip down to Maryland for my MIL's 90th birthday, gift making, Christmas parties, multiple trips to son #1's house, two blizzards, bitter cold weather, and a couple of weekends with Baby Girl. Baby Girl, who is 18 months old now, got a puff quilt for Christmas. We took her to a craft fair, and she liked this; so she and her brother got it for Christmas. No way would I make one of these, would rather pay someone else!

My MIL moved to an assisted living facility last summer. At 90, she is forgetful and sometimes is easily confused, so she needs something on the door of her room to remember where it is. After her Christmas wreath was to come down, I stitched out this hummingbird for her door. There's some foam core inside to give it some stiffness. Now hubby wants one too.

We exchanged ornaments at the Christmas party for Monday Embroidery Group, so I made a couple of these free standing lace ornament covers. They turned out very nicely, but I never got one made for myself. Next year.

I must have made 6 or 7 dishcloths for Christmas. The kids each got two diagonal dishcloths with Christmas colors, plus a couple for us. This one was made from Red Heart Scrubby yarn, a polyester yarn I think. There is practically no absorbency to this yarn, but it scrubs well enough. Red Heart offers this yarn in cotton too, but it's harder to find and there isn't a huge choice for colors. I ordered mine from Amazon.


This is what the yarn looks like, so it's very forgiving if you make mistakes. Like many other novelty yarns, it's also harder to see if you drop a stitch and harder to rip back the work. It's also too busy for a patterned stitch, so a plain round garter stitch pattern worked fine.

After I knit so many dishcloths, I decided I wanted to use up some of the leftovers, so I made one last diagonal dishcloth. Ugly but functional.....

... and it's better than this, lol.

Wanda at Exuberant Color made a lovely dishcloth from leftover bits. I shall aspire to make my leftovers more attractive in the future, lol.

The Halloween quilt is coming nicely but I shall wait until I have a bit more of the top sewn together before I post it again. Still have over a dozen appliques to stitch out. The quilt is not that big--good wallhanging size--but it's lots of work to prepare, stitch and square up these embroideries.

Plus there are several other things I'm working on right now. Hoping to get four finishes in February.