Monday, December 2, 2013

Celtic Solstice Part 1

Autumn is always a very busy time of year for me, and this
year was no different. We grappled with health issues in the family, some of which have been resolved, some not. Fall classes started up in September at my Local Yarn Shop, so I've been doing lots of knitting. Hubby sided the house this summer with cedar shingles, and that work had to get finished before winter. We had 9 cords of wood to cut, split, and stack; and there was the fall clean up in the yard.

All in all, not a lot of quilting has gotten done since August. I did finish the Turning Twenty quilt (renamed Rainbow Jungle), and I think that's the last project I worked on seriously. I've tried to get back into my sewing, but nothing really moved me. . . until Bonnie Hunter sent out a newsletter that her annual mystery was starting at the end of November. Nothing like a good Bonnie Hunter mystery to get you back in the swing of things!

So far I've only made 30 of 92 orange-blue triangle units for Part 1. I'm taking my time because I am experimenting with each of the four methods Bonnie mentioned in the first clue--using the Inklingo software to print on fabric, using the Inklingo software to cut templates, foundation piecing, and cutting out pieces using the TriRecs rulers. The units I pieced with Inklingo went together Perfectly, but foundation piecing is my preferred method right now. I'm cutting slightly oversized shapes with the TriRecs rulers, then paper piecing them. Extra work, I suppose, but I'm enjoying it instead of stressing whether or not they'll finish to the right size, and I'm really not in any hurry.

Bonnie didn't disappoint with her colors for the Easy Street Mystery last year, nor with the Lazy Sunday Mystery in Quiltmaker magazine, in January; so I decided to go with her color choices again this year. I am Lovin' the orange-blue combination so far.

See what other mystery quilters are doing on Bonnie's blog here.

We had a little snow yesterday, an inch or so, and it was a gray, cold, raw day today--a perfect day to stay in and sew.

Thursday, August 22, 2013

August Finish

I haven't sewn a thing this week except a handful of border units for the Lazy Sunday mystery. I'm still not finished with Part 3, but all I have left to do is the border units, and I have nearly 60 left to make. I've done all the cutting for Part 4 though, so once I finish the border units, I'll be able to start sewing the top together.

This is not the final layout. There's a row missing across the bottom (because it wouldn't all fit on the design wall), and there's sashing that goes in between the blocks.

I want to have the top completed by the end of the month.

The Curvy quilt is now quilted, bound, and labeled. My quilt chapter has decided to do it as a workshop, but not until next year, so I have some time before I have to start on the second one.

The Turning Twenty has been quilted as well but I'm still working on hand stitching the binding. One side done, three to go.

The fabric I used on the back was one of those what-was-I-thinking purchases, and I think I bought 10 yards of it. It actually worked out well for the back of this quilt, and I got rid of 6 yards. It was called Rainbow Jungle on the selvage, which I think is a pretty good name for the quilt.

This pantograph from Linda Taylor was the most jungle-y looking design I had, so I used it for the quilting.

I plan to have this one done by the end of the month too.

The Bugs in a Jar strippy was quilted with a dragonfly pantograph. Such a cute print for a kid's quilt, and I love the bright colors. The back is a lime green flannel. I've got another one of these made up, only with yellow strips where the orange is. I never get tired of these strippys, and they are all donated.

I doubt I'll get the binding on this one done by the end of the month.

Credit where credit is due: Curvy designed by Mark Lipinski, from Fons and Porter's Love of Quilting May/June 2013

Tuesday, July 30, 2013

Reader Problems. . . Again

I am SO annoyed that, after I hunted down another blog reader before Google Reader ceased to exist on July 1, the new web based blog reader I chose is also threatening to shut down. I went with The Old Reader, because it was the most like whoever I used before Google Reader (can't even remember now who that was). When GR shut down, about 2000 people migrated to TOR, overloaded their system, threw their lives into utter chaos; and less than a month later, they're threatening to dump all the new users unless some other entity takes over the reader. It just figures I would pick them!

Since blog readers seem to be dropping like flies, I exported all my feeds to Bloglines AND Feedly (I thought a backup might be a good plan), but it's getting to be a chore to keep finding new readers. Not to mention that I'm having more than a little trouble navigating the new readers and managing my blogs. I suppose I'll figure it out eventually. Enough already!

Monday, July 29, 2013

Monday Sew Day

I finished all 23 green and purple blocks today, and I'm done with Part 2 of the Lazy Sunday mystery. Yay! My goal was to get that done by the end of the month. I got the latest issue of McCall's Quilting in the mail today, so that tells me Quiltmaker magazine will probably arrive within the week, and that issue will show the last part--and the reveal.

There are purple corner squares in two of these blocks that look like a white/purple plaid, which I didn't notice until I put the photo up. I find them a bit distracting and may have to take them out.

Barb and Sandy came over today, as they do every Monday. Barb did not work on her longarm today, but cut out pieces for a Turning Twenty instead. Sandy finished her little Halloween quilt today, and I thought she did a great job. Sandy has been quilting not quite a year and a half, and she is fearless when it comes to taking on a new challenge. She mentioned today that she is interested in paper piecing as a future project. I love paper piecing, so it will be fun teaching her how to do it, when she's ready.

Lazy Sunday

It wasn't really a lazy Sunday. I was busy all day cleaning my basement sewing room and doing more sewing. I am still working on Part 2 of Bonnie Hunter's Lazy Sunday mystery from Quiltmaker magazine, but not too much more to go. These units, hundreds of them, are all done for the first two parts of the mystery.

Now I have to make 24 purple and green blocks, and when I get to Part 3, 24 orange and pink blocks. I've made one of each to see how they'll look. I am so liking these colors!

Sunday, July 28, 2013

King's Crown Done

Thursday evening marked the beginning of Maine Quilts, our state's quilt guild's annual quilt show. They always kick it off with a Champagne Preview on Thursday evening from 7:00 to 9:00. I had a free ticket for the preview and went to the show, but I also made up my mind I was going to finish my King's Crown quilt that night as well. I worked on the binding for quite a while during the day but still had most of a long side left to hand stitch. Took me until one in the morning, but I got it done, had it on the bed, and slept under it. Yay!

Most of the fabrics in this quilt are civil war repros, but there are a few odd pieces that I liked and appealed to me. The original quilt was set on point with all different sashings, but I didn't much care for the look of it; so I kept all my sashings the same and added a four patch in the corner of the border. Love how that looks!

Credit where credit is due: From the book More Nickel Quilts by Pat Speth.

Wednesday, July 24, 2013

Summer Quilting

It's been a while since the last time I posted, and I've been doing lots of quilting. One of my quilting gal pals had this quilt loaded on her frame one day, and I liked it so much that I hunted down a kit for it in the Keepsake Quilting catalog. It's called "Montana Log Cabin", and it now lives on hubby's recliner. This was another finish for May.

Years ago there was a quilt magazine called Foundation Piecer, which contained exclusively projects that were pieced on paper foundations. The magazine eventually changed its name to Quilts with Style, and not too long thereafter, the magazine failed and was no more.

At one point in time, pieced blocks with black leading were all the rage in the magazine; and this sampler was from one of the magazine issues. The publisher, Zippy's, also printed several pattern books with dozens of stained glass blocks. I have a couple of those books still and thought I might do another one of these sampler quilts some time.  

I hemmed and hawed for a long time, trying to decide what thread color to use to quilt my sampler and what pattern to use. I finally settled on a pantograph called Twofold Feathers with a variegated thread in jewel tones. I love how it turned out. This quilt was my June finish.

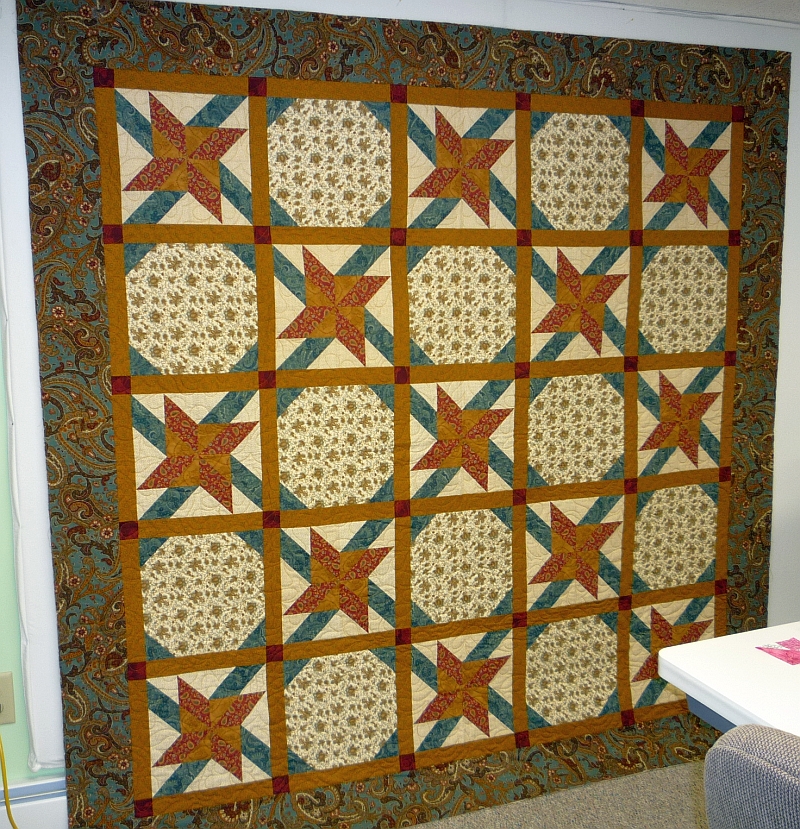
BarbaraD is the president of our quilt chapter, Tacoma Lakes Quilters, and she's been a wonderful president. Last summer someone thought it would be a good idea to recognize Barb's contributions with a quilt, and I was volunteered to chair a committee. A few of us had seen this quilt, Rhubarb Pie, in the Keepsake catalog, and we voted to make it as the president's quilt.

I started collecting four patch blocks from the membership in September and started assembling the quilt in January. I laid out the blocks for a quarter of the quilt at a time and then had a sew day with committee members to sew that section together. I liked that approach so much that I've made a couple of other quilts the same way--working on a quarter section at a time.

We also pieced the back of the quilt, using the brighter four patches (taken down to two patches) for sashing. The idea for the backing came from the cover of a McCall's quilting magazine that came out earlier this year. There are four fairly plain squares in the backing that we used for signature squares, and we managed to get the signatures of every single one of our members. Then we had one of our members machine embroider a label (in the lower right corner), gave it to another member for binding, and presented the quilt to Barb at our June meeting.

Beats me how we kept this a secret as long as we did. Barbara keeps her longarm down in my basement sewing room, and she comes over every Monday to work on it. Every Monday after she left for the day, I'd throw some blocks on the design wall, spend hours arranging them, and then Sunday night I'd have to take everything off the wall and hide it. With help from my committee, we got a quarter section sewn each week, so I didn't have to keep rearranging the blocks.

Because of all the work I put into this quilt, and because I was on the hook for it, I'm counting it as a June finish, even though I didn't get to keep it!

I worked on these King's Crown blocks here and there for a couple of years and finally got them together, added the borders and got it quilted this month. The binding is attached, and I'm working on the hand sewing. I plan to have it all finished by the end of the month. I machine embroidered a label for it this morning, then later in the afternoon realized I'd embroidered the text on the wrong side of the fabric. I'll be stitching a new one out in the morning.

I had to buy four half-yard cuts for the brown borders and wasn't sure if I'd have enough. I wanted to keep the motif in the borders all facing the same direction, and I also wanted to match the motifs down the length of the borders so that it wouldn't look chopped up. That worked out pretty well, so I matched the motif in the corner four patch to the border as well, just to see if I could do it. Worked out pretty well!

This is another quilt that was just a top for a couple years, and I finally had a friend quilt it for me. I mail ordered these fabrics for another project and was disappointed when they arrived. The colors were duller than were pictured in the catalog, and the scale of the border print was all wrong. They sat in the cabinet for quite a while until I finally hauled them out to use them up for a challenge quilt. I suppose it is a rather plain quilt, but I like it now that's it's almost finished. Still have to put the binding on.


This is the Curvy quilt, so named by designer Mark Lipinski. This quilt appeared in an issue of Fons and Porter's Love of Quilting, two issues ago, I think. I have always shied away from curved piecing, but I found this design so interesting that I resolved to give it a try.

So I pulled 20 fat quarters from the stash that had red, yellow, and green in them and got started. A template to cut the curved pieces was included in the article, but I decided the specialty ruler Simple Curves might be easier. I got more proficient sewing the curves as I went along, and now I'll be making a second one in order to teach a small workshop for Tacoma in the fall. I think this quilt would be really fun in Kaffe Fassets too. I just finished doing the quilting on this today, but I won't get the binding on it til next month.

I know lots of folks like the Turning Twenty quilts, but I was never crazy about them until I found the book for this quilt, Turning Twenty Hope Chest Treasures. It sort of reminds me of Lincoln Logs we had when we were kids. These are 16" blocks, so this is probably the fastest top I ever made. Quilt show for Maine Quilts begins tomorrow for four days, so quilting and binding for this quilt will have to wait until next month too.

Saturday, May 25, 2013

Embossed Leaves Socks

After I succeeded in learning how to knit two socks on two circulars, I wanted to try a patterned sock, that is, some pattern other than stockinette or ribbing that runs the length of the leg and down the instep. I signed up for the class for this sock three times, but there were never enough people signed up to make it go. Finally the instructor relented and said she'd teach a couple of us privately.

The Embossed Leaves sock pattern is from a book called Favorite Socks by Ann Budd. I really like this pattern a lot, so I hunted the book down on Amazon and plan to buy it next month. There are some lovely patterns in it that I'd like to try.

In the meantime, I bought this book yesterday, also by Ann Budd, at my local yarn shop, Hook, Yarn and Stitcher. It is full of interesting techniques and detailing to take sock knitting to the next level (at least for me), like this fun pattern on the bottom of your socks. There's a DVD inside the book, which will help with the mechanics of the techniques. These two books should keep me busy for quite a while.


Easy Street Finished

My Easy Street quilt has been quilted and waiting for binding since the beginning of the month, and it's finally labeled, bound, finished. It is bigger than I thought it would be, 93" x 93. Two of the kids are already fighting over it, but I want to have it for a little while first. After I finish the Lazy Sunday, which has all the same colors plus orange and fuschia, then maybe I'll let them choose which one they'd like.

Not much progress has been made on Lazy Sunday, Bonnie Hunter's mystery quilt from Quiltmaker magazine. I have three other big quilts that are close to being finished, all three UFO's, and I'd like to get those done first; so I'm making the half square triangle units from Lazy Sunday as leaders and enders for the other three projects. Next month I plan to work on it in earnest. The release of the next Quiltmaker containing the last part is right around the corner, I think.

The weather has been miserable for most of the spring, and this week has been cold and rainy again. The grass will be up to our knees before the ground dries out enough to get out and mow. We also have 9 cords of logs to cut, split, and stack; new cedar shingles to re-side the house with; and 12 new replacement windows to install, but the weather won't let us. It's gonna be a busy summer. Those sweet little bleeding hearts in the header are lovin' the weather though.


Sunday, May 12, 2013

Knitting Finishes

I finished weaving in the yarn tails on these socks this morning. The knee socks are for my sister-in-law, and I've been working on them for quite some time. My SIL is taller than I am and needs a 19" leg, so no wonder they took so long.

The baby socks were an experiment in knitting two socks on two circulars. I tried this technique two or three years ago, and I can't remember now whether I ever figured it out or not, but I didn't stick with it. I finally took a class a month or two ago at my local yarn shop, and wa la! Success!

 I've been knitting socks and small accessories for about four years now and wanted to move up to knitting an adult garment. My local yarn shop owner suggested a vest, so I pestered until she found someone to teach the class.

The pattern is a freebie from Paton's, their Chunky Knit Vest, I think. There were lots of learning opportunities here--sizing and fitting a garment, making a gauge swatch, invisible seaming for the sides and shoulder seams, picking up and adding a seed stitch trim, and buttonholes and buttons. The best part is that it actually fits me. 

I'm working on a new sweater now from Knitting Pure and Simple, top down, no side seams, no buttonholes, and no set in sleeves. Easy!

The shawlette class presented another learning opportunity--lace edging. I had fun making this, but it was an exercise in patience because I used fingering weight yarn, and it just took a long time.

I took my daughter-in-law to the yarn shop and showed her the model of the shawlette, then told her if she liked it, she could pick out the yarn and I'd make it for her birthday. That was in February, her birthday was in April, and I just barely made that deadline.

After I finished it, I decided I liked it well enough to make one for myself. I've added it to my arm-length list of knitting projects to do.

The yarn for this shawlette was Ella Rae Lace Merino. I love this yarn! Can't wait to make some socks with it.

Thread Case

Happy Mother's Day to all you moms out there! It's been a cool, rainy day here in Maine, but the sun finally came out a little while ago. I spent all day in my sewing room, finishing up this thread case for a workshop I'm assisting with on Wednesday.

I've wanted to make one of these for several years, and I'm so pleased it's finally finished. The pattern directions were clear, and the case was easy to make. I don't know why I didn't just do it a long time ago.

The fabric of the case is quilted, and it closes with a piece of grosgrain ribbon wrapped around the case and held shut with velcro.

It unfolds to reveal five vinyl pockets that hold up to 48 spools of thread plus a few sewing necessaries.


The case opens to 10" x 30" and folds to a nicely compact 8" x 10".
The tan fabric under the zipper is a piece of ultrasuede or faux suede. Thread tails are fed through the ultrasuede, and you can easily thread a needle without removing the spools from their pockets by simply pulling the thread through the ultrasuede.
The sewing necessaries pocket is about 6 inches, so there's plenty of room for scissors, needles, thimble, measuring tape, other notions, and of course, a little chocolate. Fabulous!

The pattern also contains directions for a smaller case that holds up to 12 spools of thread and folds up to 5" x 5".

Credit where credit is due: Thread Dispenser/ Sewing
Case, designed by Patterns by Annie

Sunday, May 5, 2013

An Apple A Day

At last, a finish! Actually, I finished a small strippy in February, but I don't bother to post photos of those anymore because I've made so many. Anyway, every year our quilt chapter, Tacoma Lakes Quilters, issues a challenge; and this year's was to make a small 16-block quilt from Maggie Ball's book, Bargello Quilts with a Twist.

These fabrics were from a kit I purchased several years ago on a quilt shop hop. The kit was supposed to make up into a quilt with four basket blocks, but I never was crazy about the pattern. I thought the fabrics would work just fine for my bargello, and that's a few more yards finally out of the stash. This quilt will make a nice little table cover for my son's kitchen table. He's a foodie, and he has red accents in his kitchen.

Saturday, May 4, 2013

Bonnie Hunter Comes to Maine

It has been too long since I posted to the blog. Life is busy, and I've been doing lots of quilting and knitting but just haven't taken the time to post about it.

The Pine Tree Quilters Guild in Maine contracted with Bonnie Hunter quite some time ago to come and teach a couple of workshops and do a trunk show for us. I am a big fan of Bonnie's; and after what seemed like an interminable wait (for me), she finally arrived this week.

I took her workshop for the Jamestown Landing quilt yesterday and had a blast. Jamestown Landing is one of the quilts from Bonnie's book, String Fling. I've been quilting a long time, and her book explains well enough how to do the piecing for this quilt, so my objective in taking the workshop was to learn more about the methods that she uses to piece her quilts; and I was not disappointed. I get so used to doing things a certain way that I don't stop to think if there might be a better way to do it, so I had some lightbulb moments during the workshop.

Bonnie took lots of pictures of our workshop and uploaded them to both her blog and her Facebook page, so you can see more there.

We received instruction on the Easy Angle tool to make half square triangle units, and she also showed us how she makes her string blocks. Jamestown Landing is composed entirely of these half square triangle units and small string blocks, arranged in an unexpected way. I only finished 14 or 15 string blocks and maybe about 70 half square triangle units, so I have lots of work left to do.

Today Bonnie did her trunk show for the membership. She is a very enjoyable speaker and shared lots of information about her scrap users system and the way she actually chooses and uses her scraps.

Her trunk show was marvelous. I thought about taking photos, but I really just wanted to listen to the lecture and look at the quilts. Besides, the photos of the quilts in her books are much better than any I might have taken at the presentation, and I have all of her books.


Bonnie has one more workshop scheduled for tomorrow in Augusta, then she'll be moving on to her next engagement. I asked her yesterday if she'd been to all 50 states to teach, and she said she'd been everywhere except the Dakotas. If you ever have an opportunity to see Bonnie Hunter, don't miss it.

Sunday, February 24, 2013

Circle Wedge Tree Skirt, Part 2

Click here for Part 1 of the Circle Wedge Tree Skirt. 

Cutting the Wedges. You need to cut at least 8 wedges from each of your strip sets to obtain the correct number of wedges for the tree skirt. You need 40 wedges to create one tree skirt.

If you're using a 10-degree wedge ruler, you'll need 36 wedges, which means you'll have 4 wedges left over. Extra wedges can be set aside for later use in a scrappy tree skirt.

Place the circle wedge ruler on your first strip set with the narrow end at the top of your strips. This is an "up cut". All the up cuts will be used to make Tree Skirt #1.

Align the 45 degree marking on your ruler with one of the seams in your strip set. Slide the ruler as close to the end of your strip set as you can, and make sure your fabric strips extend beyond the upper and lower edges of your ruler.

Every time you make an up cut, you'll need to place the ruler in the same position on all 10 strip sets. You might want to make yourself a note as a reminder.
 
If you are unable to place the 45 degree marking of your ruler on a seam line, align the 45 degree mark parallel to one of your seams. Then place a piece of painter's tape along one of the seam lines and make a note to yourself where to line up the tape on the next cut. Remember, every up cut must be cut the same way.
 
After you have cut the first wedge, flip the ruler around so that the narrow end is at the bottom of the strip set. This is a "down cut". Again, align the 45 degree marking on the ruler with one of the seam lines in the strip set. The long edge of your ruler may or may not line up with the edge of the wedge you just cut. It is more important to have the 45 line on one of your seam lines or parallel to one of them.  

Make a note of the placement if necessary so you can repeat the exact placement on all 10 strip sets.

All the down cuts will be used to make Tree Skirt #2.

Continue cutting wedges from your strip sets, flipping the ruler after every cut. You should have at least 4 up cuts and 4 down cuts.

If you are able to cut 9 wedges from your strip sets, you can use the extra wedges from several different strip sets to make a scrappy tree skirt.


Up Cut and Down Cut

Using either the up cut wedges or the down cut wedges, start sewing wedges together in pairs, matching the top and bottom edges of the wedges. No other matching of seams is required along the length of the seam. Remember these are bias edges, so place as many pins as necessary along the seam line.

Continue sewing pairs of strips together until all 40 wedges are sewn together in a circle. Do not sew the last two wedges together because you'll need an opening to go around your Christmas tree. 

Press all of your seams in one direction. Press (up and down), don't iron (back and forth)!

Now make your second tree skirt. 

Quilting. I used a regular weight batting for my tree skirt, probably Warm and Natural, but you could use a thinner batting, like Thermore or Pellon fleece, or maybe even a flannel if you wanted. If you plan to quilt your tree skirt yourself on a domestic sewing machine, quilting in the ditch will suffice. You'll want to use a walking foot. You can start by quilting in the ditch every 5 or 6 wedges to secure the layers, then go back and quilt in the ditch along every seam line. I have a long arm, and I loaded my skirt on a square backing and used a pantograph to quilt my skirt. 

Binding.  Because the outer edge of your tree skirt is a curved edge, you must use a bias binding. According to the original directions that I had, about a yard of binding is required for one tree skirt. I did not add ties to my skirt; but if you wanted to, you could use extra binding or ribbon.There is a good tutorial illustrating a method for cutting bias binding strips here.