Tuesday, February 19, 2019

The Puff Quilt... and a Finish!

Making the puff quilt was not as difficult as I anticipated, and I'm documenting the process here, not only for some other soul who might take the challenge, but mostly because I don't want to forget how I did it. I figured out a few tricks of my own beyond what I saw in YouTube videos.

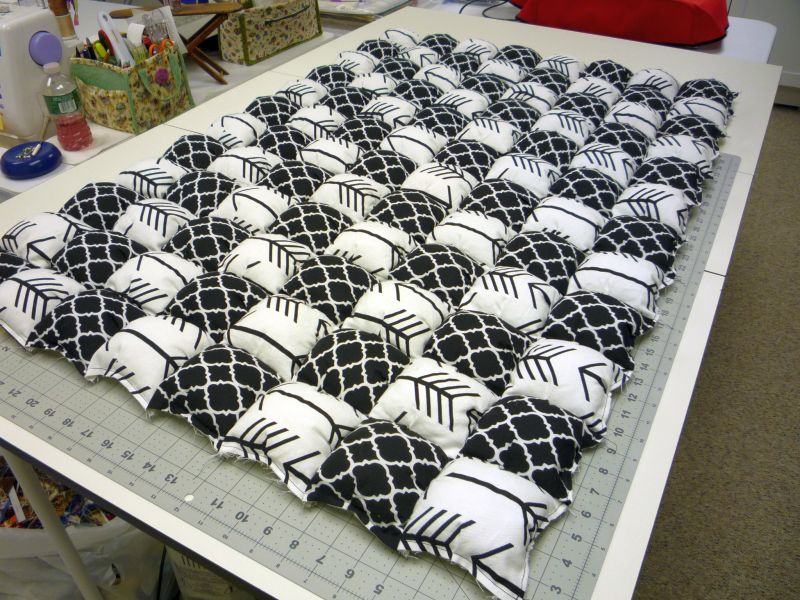
For someone who really was learning how to sew for the first time, DIL did extremely well with the process. And what a taskmaster! We decided to make the quilt 12 x 12 puffs or 144 puffs. I cut while she sewed, and we sewed up all but 24 squares on Saturday and finished the rest on Sunday. I was exhausted Saturday night when we finally quit.

We used 4-1/2" muslin squares for the bottom, and 5" squares of focus fabric for the top of each puff. Squares were sewn on three sides with a 1/4" seam allowance, leaving one side open for stuffing.

Because the top square was larger than the bottom square, it was necessary to sew a pleat into the top square. We eyeballed this so the pleat was approximately centered on the square.

Once all the squares were made, we sewed 12 squares together to make each row.

At this point the squares were not stuffed. I tried sewing two stuffed rows together and oh, what a chore that was. It was so much easier to sew an unstuffed row to a stuffed row, then fill it with the fiberfill and sew the squares in the whole row closed.

I also discovered that if I sewed the row closed with an 1/8" seam allowance, then I didn't have to worry about a line of thread showing on the top after the rows were sewn together. When I added the next unstuffed row, I used a 1/4" seam allowance.

I took 9 rows home with me to work on because DIL wasn't sure how much she'd be able to get done on her own. She actually got her 3 rows all done a day or so later. I finished mine last week.

I very much like DIL's fabric choices. She has another piece for the backing with black skeleton heads on a white background that I think will be really cool.

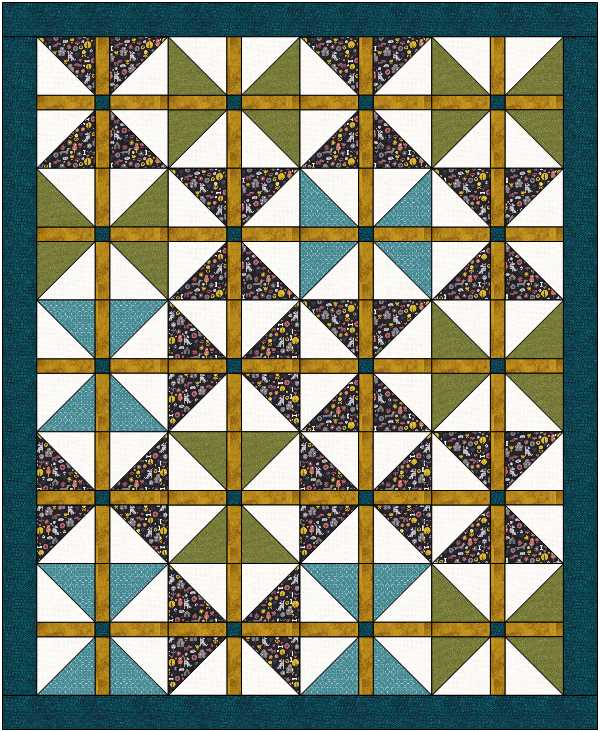
I also finished the binding on this string quilt last week. This is a rather strange quilt to me, but I took a liking to it and wanted to make it. It is from a book called Small Pieces, Spectacular Quilts by Biz Storms and Mary Elizabeth Kinch. They called it "Go With the Flow", I call mine "Heartstrings". There are some insane quilts in this book, but there are a couple others I'd make.

The blocks finish to 12", and they are composed of vertical bars of varying widths. One of the blocks has 5 vertical bars, the rest have 4 or less. My friend Koleen, who passed away in 2017, was making 4" x 8" sections of string blocks for a quilt of her own design at the time. I had about 6 of those blocks plus all the string sections she'd made; and I tried to love them... but I didn't.

When I found this pattern and decided to make it, I took Koleen's string blocks and worked them into my 12" blocks. Every last piece of Koleen's string blocks was incorporated, even if it meant taking the smallest leftover strip and using it as a string itself. These blocks are so busy you really have to hunt to find these string-pieced strings.

Done!
I also turned out a new batch of soap last week, a small one-pound batch. I realized that if I kept making 2- and 3-pound batches, not only would I quickly run out of storage space, but I'd never be able to use it all up. This batch got too thick before I had a chance to try and swirl it, but I still like how it turned out. I'm not much good at swirling anyway, but I keep trying, lol.

The colors are not quite true in the photo--the purple is brighter, and the white is whiter. I scented it with lavender and chamomile. I hadn't used chamomile before, didn't really care for the scent, but it's very intriguing blended with the lavender. Chamomile essential oil is pretty expensive, but I'll use it again.

Saturday, February 9, 2019

Yankee Puzzle

I spent most of Tuesday and Wednesday cutting and kitting up fabric for this Yankee Puzzle quilt. This picture is an image from EQ8, but I do have one made up. My quilt chapter is very charity minded, so we are having a workshop next month to make 10 of these quilts to donate to a local area veterans' shelter. The chapter paid for all of the materials for these quilts; so several of us washed, ironed, and cut fabric for the kits. I think a few chapter members will also make their own quilts, so hopefully we'll have more than 10 finished quilts.

For those who are interested, the designer wrote instructions to construct the quilt and made a series of step-by-step videos detailing each step. That post is here.

This was my chapter's raffle quilt from our show this past October. It's called Scrap Crystals, designed by Bonnie Hunter. (Yes, we got permission to use it as a raffle quilt.) My dear friend Koleen passed away in July 2017 from cancer, and one of the things she told us before she died was that she wanted Tacoma to have this quilt for our raffle quilt. At that point it was still just a top, so one of our members quilted it, I bound it, and it became part of our October 2018 quilt show. We earned over a thousand dollars from ticket sales from Koleen's quilt, half of which we just spent for the Yankee Puzzle kits.

The winner of the raffle quilt heard the story about Koleen and gave the quilt back to us because he thought one of our members should have it. We again raffled the quilt, internally, and awarded it to one of our members. From that second raffle, we earned  $760. Thursday five of us made a trip to the Harold Alfond Center for Cancer Care in Augusta to donate those funds, to be used for cancer patients within our own communities. I think Koleen would have been very pleased.

I bought this puff quilt for my granddaughter and her brother for Christmas 2017. This is one of those things that I never had a desire to make and was more than happy to pay someone else to do it, swore I'd never make one. About two weeks ago, dear DIL, who is not a quilter, in fact can barely thread a needle, decided she wanted to make one of these things. So! I hunted down a YouTube video detailing the process, and I will be spending the day today helping her put this together....

I'm taking this cute little apron down with me today for my granddaughter. It's vinyl-coated fabric, not stiff at all, so just a quick wipe to clean it up. One of my friends actually made it for one of her great grandchildren; but it was too small, so she gave it to me. What I absolutely love about it is that there are casings on the sides, so you can adjust the size of the tie around the neck. Brilliant!

Baby Girl has always loved to put things in my shirt pockets, so I wanted to make her an apron but never got around to it. Problem solved! She's two and a half, so I think it will fit her just fine. Barbara gave me the leftover fabric from the apron, so I added the pockets after the fact.

Tuesday, February 5, 2019

It's A New Year...

... and migosh, it's already February. Time moves so quickly these days. Last year was an extraordinarily busy year for me. Staying busy with the family accounts for much of that time, but I also worked two quilt shows during the summer and fall, and then the holidays. There simply are not enough hours in the day.

And soapmaking. I spend more time reading about soap than I do about quilting. I took a couple of adult ed classes in January and February last year and learned how to make cold process soap. I've been hooked ever since. I make it on a small scale for family and friends, and I really like experimenting with all the different ingredients you can add to soap. I've added body butters and lotions to my repertoire, and my extremely dry skin is so much better for it this winter.

This past Christmas, my son indicated he wanted to learn; so I bought him all the tools and some reference material; and he's as hooked as I am. Now my daughter-in-law has gotten in on the act, and my younger son told me yesterday he wants to learn too. I'm lovin' it.

This is a lovely batch of orange-scented soap with some marigold petals on top that I cut last week. I'm anxious to use it, and I wish I didn't have to wait for it to cure for four weeks. 

I managed to finish 12 quilts last year, some of which were in the works for quite a while. All of the ones featured in the last post, which was from May of last year, were completed. Nothing like commitment to display at a quilt show to motivate, and here are the others I finished last year.


Jungle Blooms was my first effort making a One Block Wonder quilt, from Maxine Rosenthal's book of the same name. I really enjoyed making this, and I absolutely love how it turned out. Can't wait to make another one. The cutting and piecing are not difficult, and moving the blocks around to create a design was absorbing.

I quilted it with something that looked like a palm frond, which I thought appropriate for the theme.


I was very happy indeed to finish Twisted Ribbons. I don't know how many times I blogged about it, and it dragged on and on. Decided it was time to knuckle down and get it finished, and it went in our chapter show in October.


Farm Girl Sampler from Lori Holt of Bee in my Bonnet was a fun quilt to make, but it definitely wasn't a quick quilt. All the blocks were made with rotary cutting instructions, no templates or applique; so some of them took a bit of time to make. I've already purchased Lori's newest book of sampler blocks, Vintage Christmas, and looking forward to getting started on that one.

Lori designed additional blocks that were not in the original quilt, so I subbed out the house for the cow block. There's a barn and a milking pail in the quilt, so I thought, why not?

I don't knit much anymore, but I was happy to include the sheep anyway.

I was also happy to see Lori included a spool block. The gingham plaid is cute enough to make a whole quilt with. Lori's book had quite a few other projects in it besides the sampler quilt, and blocks were all included in two sizes. There is so much you could do with these blocks.

This year will be another year with multiple charity quilts, and some golden oldies for a chapter UFO Challenge. This Quilt of Valor is from a kit that the state rep gave me to work on last October. The ribbon border was a pain but worth the effort. I've been trying to make time to get it loaded for quilting, but that hasn't happened yet... I've finished a few other tops that are also in the RTQ (ready to quilt) pile, and you'll see those eventually; but the Quilt of Valor is the next one I need to push to finish.