Showing posts with label Tutorial. Show all posts

Saturday, January 4, 2020

New Year, New Goals

Happy New Year to all. It's a new year with a new set of goals and new projects I want to work on. I'm doing the One Monthly Goal again this year--for me it was not 100% successful last year, but it was enough of a motivator that I'll do it again this year. Although I did not list the last one, Woodlands, I did finish 11 quilts, so I'm happy.

For the month of January, my goal is to finish this small baby quilt. My chapter is doing a bucket list challenge this year, and I chose a Twister quilt. To see what others are planning for OMG for January, click here!

I've had the smallest size ruler for years but never used it. There are now 6 different Twister rulers from two different companies in a range of sizes--and I now own all of them. For my challenge, my plan is to make one in each size. This is the first, and if this is the only one I finish, I will have still met the challenge.

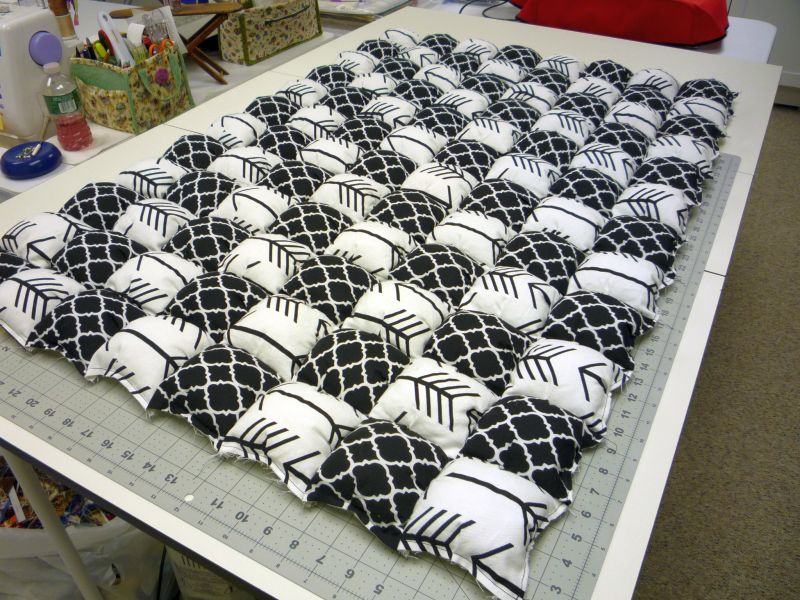
This will be a baby quilt for a new baby in the family. The blocks finish to 9", and I'm adding two rounds of borders to bring it up to about 36" square. In the upper left corner of the photograph, I have two border squares set in place, 30 more to go. One seam, should be quick.

The process to make a Twister quilt is not difficult or time consuming--it's actually pretty quick. You must have the Twister ruler though: and I have to say, there is a fair amount of waste, which some people will find unacceptable. I'm not sure how I feel about that yet, so I made myself a template for the border squares instead of using the Twister method, no waste there.

The packaging for each ruler tells you what size squares to cut for the first step. For this quilt, I needed 5" squares--a charm pack would have worked very well. I happened to have a layer cake, so I took one of each print out of the stack and cut them into quarters, which gave me 4 charm packs, essentially. It'll be fun to see how many quilts I can get out of this one layer cake.

The first step for my block was to sew the required number of squares together and  surrounded with strips of background fabric. Making blocks rather than sewing together rows and rows of squares for a whole quilt, as some patterns call for, is an easier way to learn how to do this, I think. Plus I liked the way the blocks looked and the design flexibility that comes with it.

It is not easy to see, but in the photograph, the ruler has been placed for the first cut in the upper left corner of the block. The lines on the ruler are aligned with the seams you have sewn in the block.


Here, the units have all been cut out from the block, and the scraps around the edges and the middles have been removed. Four squares and a border gave me 9 units.


Next, the units are rotated slightly to form a square.....

.... and then they're sewn together to make one block. I love this!

As these are smaller units, larger scale prints probably wouldn't have worked well. Some of mine were a medium scale, and I think they'll be fine. I also knew the prints with white backgrounds wouldn't have enough contrast with my background fabric, but I elected to use them anyway to use them up. Baby won't mind, lol.


Tuesday, February 19, 2019

The Puff Quilt... and a Finish!

Making the puff quilt was not as difficult as I anticipated, and I'm documenting the process here, not only for some other soul who might take the challenge, but mostly because I don't want to forget how I did it. I figured out a few tricks of my own beyond what I saw in YouTube videos.

For someone who really was learning how to sew for the first time, DIL did extremely well with the process. And what a taskmaster! We decided to make the quilt 12 x 12 puffs or 144 puffs. I cut while she sewed, and we sewed up all but 24 squares on Saturday and finished the rest on Sunday. I was exhausted Saturday night when we finally quit.

We used 4-1/2" muslin squares for the bottom, and 5" squares of focus fabric for the top of each puff. Squares were sewn on three sides with a 1/4" seam allowance, leaving one side open for stuffing.

Because the top square was larger than the bottom square, it was necessary to sew a pleat into the top square. We eyeballed this so the pleat was approximately centered on the square.

Once all the squares were made, we sewed 12 squares together to make each row.

At this point the squares were not stuffed. I tried sewing two stuffed rows together and oh, what a chore that was. It was so much easier to sew an unstuffed row to a stuffed row, then fill it with the fiberfill and sew the squares in the whole row closed.

I also discovered that if I sewed the row closed with an 1/8" seam allowance, then I didn't have to worry about a line of thread showing on the top after the rows were sewn together. When I added the next unstuffed row, I used a 1/4" seam allowance.

I took 9 rows home with me to work on because DIL wasn't sure how much she'd be able to get done on her own. She actually got her 3 rows all done a day or so later. I finished mine last week.

I very much like DIL's fabric choices. She has another piece for the backing with black skeleton heads on a white background that I think will be really cool.

I also finished the binding on this string quilt last week. This is a rather strange quilt to me, but I took a liking to it and wanted to make it. It is from a book called Small Pieces, Spectacular Quilts by Biz Storms and Mary Elizabeth Kinch. They called it "Go With the Flow", I call mine "Heartstrings". There are some insane quilts in this book, but there are a couple others I'd make.

The blocks finish to 12", and they are composed of vertical bars of varying widths. One of the blocks has 5 vertical bars, the rest have 4 or less. My friend Koleen, who passed away in 2017, was making 4" x 8" sections of string blocks for a quilt of her own design at the time. I had about 6 of those blocks plus all the string sections she'd made; and I tried to love them... but I didn't.

When I found this pattern and decided to make it, I took Koleen's string blocks and worked them into my 12" blocks. Every last piece of Koleen's string blocks was incorporated, even if it meant taking the smallest leftover strip and using it as a string itself. These blocks are so busy you really have to hunt to find these string-pieced strings.

Done!
I also turned out a new batch of soap last week, a small one-pound batch. I realized that if I kept making 2- and 3-pound batches, not only would I quickly run out of storage space, but I'd never be able to use it all up. This batch got too thick before I had a chance to try and swirl it, but I still like how it turned out. I'm not much good at swirling anyway, but I keep trying, lol.

The colors are not quite true in the photo--the purple is brighter, and the white is whiter. I scented it with lavender and chamomile. I hadn't used chamomile before, didn't really care for the scent, but it's very intriguing blended with the lavender. Chamomile essential oil is pretty expensive, but I'll use it again.

Sunday, February 24, 2013

Circle Wedge Tree Skirt, Part 1

We're having another snowstorm today, with another 8-12 inches of wet, heavy snow predicted.  A perfect day to be inside quilting, knitting, and blogging.

I've hardly sewed at all the last week or two, so virtually no progress has been made on my Easy Street mystery. I'm too busy taking classes at my local yarn shop. Homework is required, so I've been very busy knitting--a scarf, a shawlette, a vest, an intarsia pillow, and a pair of socks. I decided to give two socks on two circulars another try, and I'm liking it much better.

Late last year several readers asked where they could find the pattern for the Christmas tree skirts I made for my two sons for Christmas. I took that class online at Quilt University, and one of the readers told me that the woman who authored those lessons passed away. I contacted Carol Miller, owner of QU, and was told that Nyla Morrison did indeed pass away four or five years ago. Because the Fingers of Fire Tree Skirt class is no longer offered at QU, I asked for and received permission to write a blog tutorial for those who were interested.

Circle Wedge Tree Skirt


*** Please read all of the instructions for Parts 1 and 2 before you begin.

These instructions will produce two 50" tree skirts with the fabric order reversed in the second skirt. In the example at left, the white fabric is in the center of one skirt, and the same fabric appears around the outer edge of the second skirt. 

Supplies. The only item required for construction of the tree skirts, other than your normal sewing items, is a 9- or 10-degree circle wedge ruler in a 25" length. 

You can buy a 9-degree ruler directly from Marilyn Doheny, the inventor of the ruler:
http://dohenypublications.mybigcommerce.com/25-9-degree-circle-wedge-ruler/
Amazon also has them.
http://www.amazon.com/25-Degree-Circle-Wedge-Ruler/dp/B005MGUHXM
I think Amazon also has the 10-degree rulers, and I believe they're less expensive than the 9-degree rulers. 

The directions are the same for either ruler.  

These rulers used to be made by Omnigrid, so my ruler will look a little different from yours, if you have to purchase a new one. 

You will probably have to add sandpaper dots, felt dots, True Grips or something similar to the underside of your ruler to keep it from sliding around when you're cutting out the wedges. True Grips work better than anything else I've tried. If you're unable to find them in your LQS, you can buy them here.

You may also need a walking foot if you plan to quilt your skirt on a domestic sewing machine. 


Choosing Fabric. You can use 6 to 10 fabrics in your tree skirt. I used 9 in the tree skirts I've made. You can use all different fabrics or you can repeat one or more if you wish. Tone on tones and small prints seem to work better than large scale prints. In this photo, I used a medium scale floral with red flowers and white flowers. It appears in the middle of the wedges. I like it, but I wouldn't use a print larger than this. You can decide if you like the effect or if you'd prefer to stick with a smaller scale print. 

I also added a stripe to my fabric set because I thought it was interesting. You can also use washable satin or gold lame, but you might have to back any specialty fabrics with fusible interfacing. 


Yardages and Cutting Requirements. Once you've selected your fabrics, you'll need to choose the order in which they appear in your tree skirt. I found it very helpful to make a fabric layout chart with small pieces of my fabrics taped to a sheet of paper. Next to the fabrics, I annotated how wide to cut my strips. 

You will be cutting 10 identical strips from each of your fabrics, and you'll be sewing 10 identical strip sets. You can choose what widths you'd like to cut your strips, but the width of your strip set must measure at least 19" finished.  

Here are the measurements I used for my tree skirt. If you change the number of fabrics used or the widths of any of the strips from my set of measurements, you will need to recalculate your yardages.

Fabric #1:  3-1/2" finished, cut 10 strips 4" wide, 1-1/4 yard required
Fabric #2:  2" finished, cut 10 strips 2-1/2" wide, 3/4 yard required  
Fabric #3:  1-1/2" finished, cut 10 strips 2" wide, 2/3 yard required
Fabric #4:  1-1/2" finished, cut 10 strips 2" wide, 2/3 yard required
Fabric #5:  2-1/2" finished, cut 10 strips 3" wide, 1 yard required
Fabric #6:  1-1/2" finished, cut 10 strips 2" wide, 2/3 yard required
Fabric #7:  1-1/2" finished, cut 10 strips 2" wide, 2/3 yard required
Fabric #8   2" finished, cut 10 strips 2-1/2" wide, 3/4 yard required
Fabric #9:  3-1/2" finished, cut 10 strips 4" wide, 1-1/4 yard required

In my chart, notice that the total of all the "finished" measurements adds up to 19-1/2", which is fine. Remember, the strip set must measure at least 19" finished. 

The yardage requirements assume a fabric width of 42" across the bolt. If your strips are 40" or shorter, you may need to piece some of your strips to get the correct length. My suggestion is to cut and sew one strip set first and cut out the wedges to see if your strips will be long enough. 

Making the Strip Sets.  To make a strip set, fold one end of your first strip at a 45 degree angle. Place your second strip right sides together, aligning the top edge of Strip 2 with the bottom of the folded end of Strip 1, and sew the length of the seam.

Fold over the top end of Strip 2, add Strip 3 right sides together, and sew the seam. 

Continue adding the remaining strips in the same manner, remembering to fold each of the preceding ends at a 45 degree angle. Because the circle wedge ruler is placed at an angle on the strip sets, staggering the strips in this manner conserves fabric.

Press all the seams in the same direction. Ensure that each strip is pressed out completely and that you don't have a small fold next to the seams. 

Once you have completed your first strip set, make 9 more exactly like the first.   

Click here for Part 2 of the Circle Wedge Tree Skirt.


Monday, September 1, 2008

Half Square Triangle Units

I'm sure I've learned a half dozen ways of making half square triangle units, but my favorite method is taking a square of background fabric and a square of fashion fabric, drawing a diagonal line on one square, sewing 1/4" away on either side of the line, and then cutting the two units apart on the drawn line. If the squares are oversized to begin with, you can square each unit up and have a perfect half-square triangle unit.

Last week I needed 560 half square triangle units, and I used a different method to make them, which is much faster and more efficient for multiple units in the same two fabrics. Maybe someone else will find it useful. I learned this method from a Quilt University class I took a long time ago. I think this is the only time I've used it since that class, but it's one more skill you can add to your toolbox when the occasion arises. Before you start, you need to know what the unfinished dimension of your half square triangle unit is. Mine was 2-1/2" unfinished.

I cut two panels of fabric, one in the background fabric and one in the fashion fabric, 13" x the width of the fabric (40" or 42"). The height of the panel is determined by how many rows you want to cut out of that dimension. Since my units were 2-1/2", 5 rows of triangle units equal 12-1/2", and I allowed a little extra to square up the edges, so each of my panels was 13" high. You can certainly cut the panel taller if you want to, but a larger panel might be a little unwieldy to handle. In fact, you can manipulate the dimensions of these panels any way you want to, depending on how many units you need and what size you want them to be.

Next I layered the fabrics, right sides of both fabrics facing up, matching the lower edges of the fabrics. Then I squared up the left edge of the fabrics.

Using the 45 degree line on my ruler, I cut bias strips all the way down the length of the panels. At this point you'll need to determine how wide to cut the strips.

Here's the formula:

finished size of unit x .71, rounded up to nearest 1/8", plus 1"

The finished size of my units will be 2", so 2 x .71 = 1.42
Round up to nearest 1/8" = 1-1/2"
Plus 1" = 2-1/2"
So I should cut my bias strips 2-1/2" wide.

The width of the strips determines how much waste you'll have between the half square triangle units. At 2-1/2" wide I had more waste than was desirable for me, so I reduced the width of my strips to 2-3/8", and that worked fine.

Next, I sewed the panels back together, alternating a background strip with a fashion fabric strip. You'll have two panels like this after you've done all the sewing. Adding the seam allowances shrinks the panel across the width of the panel (the 40" dimension). It also shrinks the height (13") of the panel, but only in the corners where you didn't cut a strip across the full heighth of the panel.

Placing the 45 degree mark on my ruler along one of the seam lines, I squared up one long edge of my panel.

Next I cut rows, 2-1/2" wide, across the heighth of the panel, which is the dimension of the unfinished half square triangle unit I wanted. From my panel, I cut five rows, with a small amount of waste at the top of the panel.

From each row, I cut half square triangle units. Because there is a small amount of waste between triangles, you'll need to flip each unit around and square it up.
There will be some waste at the beginning and end of each row; and if I have enough fabric, I'll pair up these waste pieces and make a few additional half square triangle units.

From one set of panels, 13" x 40", I made 114 half square triangle units.

Friday, February 8, 2008

New To Me Binding Trick

I always dread sewing the binding on the front of my quilts, because joining the ends of the binding strips when you get back to the beginning has always been such a chore for me. My quilt books all tell me to fold and cut those ends at 45 degree angle and then stitch them together. I can never quite figure out how to measure them correctly, and it's always awkward trying to fit that mitered seam under the presser foot without some stretching and shifting. The worst part is that I can never remember exactly how I did the last time, so it's a new challenge every time I put on another binding.

A few months ago at a chapter meeting, my good friend Ann demonstrated a method of sewing the ends together that alleviates all those problems for me. I thought I must surely be the last one to learn this method, but I don't think any of us in the group had seen it before. I sewed the binding on another UFO yesterday morning using this method, and it worked perfectly, again. I am so excited about this, and I thought I'd share it with you.

When I begin stitching the binding on, I leave a tail at least 5 inches long, and 6" would probably be a little easier. When you've sewn all the way around back to the beginning, leave a gap 10" or 12" wide, and leave the second tail, maybe 10" long.

Cut both ends straight, as in the photo.

Pin down the beginning tail along the edge of the quilt, as if you were going to sew it.


Pin the ending tail in place along the edge of the quilt, butting it up to the beginning tail and folding it back on itself. Pin in place. At this point we are determining exactly where to cut that second tail.

For this step you must know the width of your binding strips. Initially I cut my binding strips 2-1/2" wide and then folded them in half to make the binding. Yours may be 1-3/4" or 2-3/4" or whatever. You'll measure that amount from the fold and cut off the excess of your binding strip at that point.

In the photo, the seam ripper show where my fold is, and you can see I've measured 2-1/2" over from the fold and marked it with a pin, and that's where I'll make my cut. Remember it's folded back on itself, so make sure you don't cut the binding underneath, just the excess tail!

Open out the beginning tail, wrong side up, and mark a 45 degree line as shown in the photo.

Place the ending tail, right sides together, perpendicular to the first one, with the remainder of the binding strip coming off the top, as in the photo. Pin it in place, and sew along your drawn line.

After you've sewn, you can trim to a 1/4" seam allowance. I recommend that you open out the binding strips to see how it looks and how it fits *before* you make that cut. Ask me how I know that!

Press the seam allowance open, then fold the binding in half again and press.

Sew the binding onto the quilt, closing that 10" or 12" gap.

And voila! you're done! Isn't that fabulous?! You can now see the finished edge in the photo, and I used a pin just to mark where we made that miter.

I hope someone will find this useful, and please let me know if something isn't clear.