Monday, July 11, 2011

A Little Liberated Quilting

This may not be liberated quiltmaking in the truest Gwen Marston sense of the word (even though she did publish a book on string quilts), but it was certainly liberating for me, and it's probably as liberated as I'll ever get. Making a string quilt is truly mindless piecing at its best. Anything goes, and it's a perfect portable project. I can run my mouth all day at sewing group and I can't screw anything up!

For the pieced strips, I cut foundations from muslin or whatever fabric I had laying around that I didn't really have a use for, 4" x 8", and pieced scraps on them using a sew and flip technique. Then I sewed the pieced foundations end to end until I had a strip long enough for my quilt. The pieced strips were then alternated with solid strips and sewn together to create the top. The solid strips were cut 3-1/2" wide.

I needed 150 foundations for the pieced strips. Each vertical row required 11 foundations plus half of another to complete the row.

A queen sized quilt, 93" x 93", requires 12 solid strips and 13 pieced strips, plus borders. I added a 7" wide border on either side and a 7" wide border on the bottom. My son who is receiving this quilt is crazy about that burgundy batik and wanted the wider borders. The top of the quilt will probably be covered up with pillows, so I didn't really want a top border.

The quilt is on the longarm now, and I got about half of it quilted today. Tomorrow I'll try to get the other half done. The plan is to have it quilted and bound by the end of the week for delivery to my son. Lots of work left to do still.

The idea of working in a series appeals to me, and this was a fabulous scrap buster, so I have four more string quilts planned. When I get around to it, the next one will also be a vertical strippy, only the pieced strips will be all different widths.

A Finish for July

Finally, I'm blogging again. Last week my son and his bride were up for the week from South Carolina. The week before that I was getting ready for them to visit, the week before that I was gone to Vermont for Quilt Festival, and the week before that I was getting ready to go to Vermont. Now that I have an iPod and an iPad, sometimes I don't turn my computer on for days, so no blogging has got done.

I don't think I've done any sewing since the beginning of July. In fact I'm sure I haven't because I finished this little strippy on July 1, and that was the last thing I remember working on. It was one day too late for the June finish, but the One Project a Month Challenge is still serving its motivational purpose. I think I'll have another finish this month, maybe two.

I so enjoyed my son's visit. Even though the weather was really nice while they were here, we didn't do much of anything. Truthfully I think the kids were content to just laze around the house, playing on their phones or the laptop. We've discovered an app for the i devices called Words With Friends, like Scrabble, which kept us entertained all week.

The kids were accompanied by a 2-year old Jack Russell named Zeek and a 10-week old puppy named Cairo. Long drive for them from South Carolina, but they were well behaved. The puppy was adorable but required constant supervision because he chews on everything, and because he is a long ways from housebroken. By the end of the week, I was thinking that this is when I liked him best--when he was napping. The kids had the good sense to crate train both dogs, and oh! what a blessing that was.

The kids left Sunday to drive back down to South Carolina. I loved having them here, and I'll miss them, but I'm happy to have the house back to myself. I'll be cleaning most of the week, I suppose, but I'll get some sewing in too.

Thursday, June 2, 2011

May Finishes

It's been a long while since I've posted to the blog. We're nearly halfway through the year and I've written nine posts. That's pitiful, so I guess I'd better rectify that!

I was really busy the month of April working on these two small challenge quilts. They were due the first week of May, and I actually finished them on time, binding and all. Then I spent the month of May catching up on all the stuff I put off in April while I was working on the quilts.

The pink and green one, "O' Tacoma", was designed by our chapter president as a mystery quilt in three parts. I liked the fact that we had to choose only three fabrics, but the challenge of assembling the quilt more than made up for it. I really liked this quilt when it was finished.

My other challenge quilt, "Snow Day", was a Mix and Match challenge. Each participant drew slips from five categories, which determined the parameters for the quilt they had to make, and each quilt had to measure 24" x 24" at completion. The categories were Theme, Embellishment, Color, Fabric, and Block.

The Theme for the quilt could have been one of the four seasons or a holiday. My Theme was winter.

An Embellishment, like ribbon, lace, yo yos, buttons, etc, had to be included somewhere in the quilt. My Embellishment was ribbon, and I cut small lengths of ribbon, laid them in the center of the star blocks like little pickup sticks, and stitched them down.

My Color, which had to appear in the quilt, was yellow.

The Fabric which had to be included could have been a novelty, polka dot, batik, solid, something like that, and mine was plaid. The snowmen, which were machine embroidered appliques, had patches on each snowman; so I cut a patch from a small scale plaid and stitched in place over top of one of the embroideries.

The Block we chose had to appear somewhere in the quilt, and there was an additional requirement that the block measure 12". My Block was Dutchman's Puzzle, which I placed in the middle of the quilt and then embroidered the snowmen on top of it. I used flannel for the snowmen bodies so the blue background wouldn't show through. They turned out pretty nicely, I thought. You can see the rest of the challenge quilts here.

My last finish for May was this small kids' quilt. The top actually got done quite a while ago, and I finally got around to quilting it.

Friday, April 1, 2011

April Fool's Day

Need I say more?


Since we had stormy weather today, I spent much of the day cleaning up paperwork. Afterwards I went down to the sewing room to play in the fabric. I've never made a bargello quilt before, so when my LQS offered a class, I decided to take it. I am supposed to cut fabric strips before class; but the class is not until April 9, so I'll have some time to make any color adjustments. I think I'm pretty satisfied with the way the colors look now, though I'm still not quite sure about the third one from the right in the top row.

We are making this quilt as the class project, which is from a book called Twist-and-Turn Bargello Quilts by Eileen Wright. This looks a little complicated for a first bargello quilt, but I'm going with it.

Monday, March 21, 2011

Small Quilts

I really like small quilts. George Siciliano and Sally Collins make the most exquisite small quilts I've ever seen, but I can't see myself making an entire quilt out of blocks that finish to a half inch or log cabins with logs measuring a quarter inch wide. No, three inches is just about the smallest block size I want to work with, and those use up the smallest scraps I keep very nicely.

Last year and the year before, I promised myself that I would make more small quilts, but I didn't. This year I'm keeping that promise to myself. Over the last month or so, I've finished four small quilts and have more in the works. They are all just tops so far, and I'll get to the quilting eventually.

The crocus that I was working on at the beginning of the month, courtesy of Eileen Sullivan of The Designer's Workshop, is finished now; and it measures 14" x 16". Old Man Winter is not done with us yet, and we got another couple inches of wet, heavy snow this afternoon. The crocuses give me hope that eventually it really will be spring. This is what I used for my paper piecing demonstration for my quilt group.

Last year at this same time, you may recall that I was asked to do a paper piecing demo, and I used this Pineapple Blossom block. The pattern is Bonnie Hunter's, but the idea for the colors came from one of Gayle Bong's quilts. This will probably prove to be one of my favorites. I love the colors in it, and I love that border fabric. It measures 22" x 22".

This one is called Strip Mine. The method is one I learned ten years ago when I took the class from Quilt University online. The class, taught by Patti Anderson, is still being offered. The fun thing about this little quilt is that the foundation used for the piecing is actually showing through as the white stars. This one also measures 22" x 22". The original blocks were six inches, so I drafted them into my EQ program and resized them to four inches. Four blocks make one complete star.

In December my Secret Sister presented me with this little pack of five fat quarters. (The dark green print was not part of the pack.) I decided that I'd use them up in a series of small quilts, but I'm not necessarily using every fat quarter in every quilt.

This is the first one in what I'm calling (for the moment) my Pink and Green series. It's a small quilt from one of Lori Smith's fat quarter quilting patterns, and I used four of the five fat quarters plus two or three fabrics I added to the mix. It measures 16" x 20".


Pink and Green #2 is also one of Lori Smith's fat quarter quilts and will finish to 16" x 20". Two of the sections in the photo have not yet been sewn together, and there are top and bottom triangle borders still to be added. I only used one of the five fat quarters in this piece.

Pink and Green #3 will be a small applique quilt, and Pink and Green #4 will be the Bra quilt, which you'll hear more about later.

Sunday, March 20, 2011

Strip Tease

Except for burying a few thread tails, my Strip Tease quilt is finished. It's not a pretty quilt, nor was it meant to be; but it turned out nicely just the same. It is a collection of fabrics that either I didn't like, didn't want, or couldn't figure out how to use in a project.

This is a very old ufo, started ten or more years ago as a project with an online group. Then it evolved into a quilt meant for my two little dachshunds. Both my dogs passed away a few years back, so now I'm giving it a local shelter that is trying to replace bed coverings on 17 of their twin beds.

The quilt was surprisingly easy to put together. I sewed strip sets with four strips to a set, then cut the diamonds from the strip sets. Next I sewed the diamonds together in long rows, as long as the bed it was meant for. Then the rows were sewn together. The seams nest together perfectly, so the rows are a cinch to sew.

The photo above shows the top before I trimmed up the ends. I guess I didn't think it needed a border, so there's none on there.

I used Bonnie Hunter's idea of sewing together 10-inch squares for the backing, which gave me the opportunity to use up more un-beautiful fabric. Same thing with the binding--I used half a dozen different dark green strips and sewed them all together.

At the end of Bonnie's article here about her scrap user's system, she explains the rationale for using 10-inch squares for a quilt back.

I used up just over 12-1/2 yards of fabric in this quilt, so it was a good stashbuster too. I plan to make another sometime soon, as there is no shortage of ugly fabric at my house.

The pantograph I used is one of Keryn Emmerson's, called Lida. First time I've used it, and I really like it.

Thursday, March 17, 2011

Quilt Carry Bag

There are no crocuses in my yard yet, but my daffodils are about 6 inches tall where the snow has melted around the foundation. I am so ready for spring.


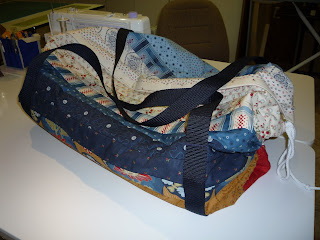
My quilt group scheduled a workshop for this carry bag in January, so I sewed the strips together ahead of time and decided I would go no further until the workshop. The workshop got canceled--several times--because of snow, and we finally had it this past Wednesday.

Sewing the strips on was probably the fastest part. The finishing details, like hemming the edges and so forth, seemed like they took forever, but I finally finished it this evening. I used a Moda jelly roll for the strips, and because I liked how they looked in the roll, I pretty much peeled them right off the roll and sewed them onto the batting in the same order. I really like this.

The idea is that you can lay the bag out flat, pile your quilts on it, then draw up the ends of the bag with the cording and velcro the top shut for travel. The bag is fairly large, and since I make a lot of big quilts, I think it will work out pretty well.

Credit where credit is due: "Quilt Carry Bag", from the book Jelly Roll Quilts by Pam and Nicky Lintott


Tuesday, March 1, 2011

A Crafty Day

Today was my monthly meeting for embroidery group, and we learned how to make an embossed design. Embossing is heavy stitching on a napped fabric like terry cloth or fleece, which mats down the background so the primary design stands out. Monograms and lettering are a popular way to use the embossing technique, so I stitched out this little "home" design on a hand towel. It looks a little shiny in the picture because I haven't rinsed out the stabilizer yet. I really love the effect. It's hard to resist the urge to go around the house embroidering every towel I own.

I am in the mood to make small quilts these days, so this afternoon I worked some more on this crocus pattern. I'm making the mini size, which finishes to 14" x 16". I started it only three days ago, so I'm making good progress.

The pattern is from Eileen Sullivan's Designer's Workshop. She has a whole series of different flower patterns, and I think I probably own all of them. She just released two new ones, Daisies and Coneflowers, which are on my wish list.

Monday, February 28, 2011

February Finish

The headless dinosaur strippy quilt is finished. Well, there are a few dino heads that didn't get cut off, but not for the main character, the T-rex. He shall remain headless.

It's a wonder the quilt got finished at all. My top thread shredded about 50 times while I was trying to quilt this top, and I was on the verge of throwing both the quilt and the machine right out the window. But I persevered and managed to finish it. Don't know what finally fixed the machine, I just kept fooling with things until it worked.


I like that Ebb and Flow pantograph from Willow Leaf. It's pretty easy to quilt, and it was the same shape as the dino tails, so it worked well for me.

Life has been very busy this month. We spent a week in Chicago, drove out to see our son's graduation from boot camp. His girl rode out with us from Maine, and the two of them got married over the weekend. Maybe a photo or two of those events later.

I've finished 3 more small quilt tops, I'm adding borders to 2 larger ones, and I'm in the middle of quilting a twin sized top right now, all of which you'll see eventually. Just had to get the February post done for the One Project a Month challenge.

Thursday, January 27, 2011

First Finish 2011

I got this little baby quilt quilted just before Christmas but didn't get around to the binding until mid-January. I think it's a sweet little quilt, and it was easy to put together, only takes 8 fat quarters. I have no one particular in mind to receive it, but it'll be nice to have a baby quilt on hand just in case.

Quilt design: "Crazy Eights" by Bits 'n Pieces

OPAM 2011

Thought I fell off the earth? Nope! Just busy. I got done with work about three weeks ago and have spent some time catching up with things at home and socializing. It's lovely to be able to get together with my quilting buddies again.

I also spent a lot of time thinking about goals for 2011. Everybody has them, right? The last two years I wanted to bust more stash and make more quilts just like everybody else, and I didn't really do so well in that regard. Last year particularly I sort of set myself up to fail by taking on just too darned much.

So, at the end of the year, I gave myself permission to take every project I hadn't finished--Star Crazy, all the quilts for the 6-Quilt Stashbuster Challenge, the projects from the Power of Ten list, and whatever else there was--and throw every bit of it in the UFO pile. It already feels good to start fresh in the New Year and go where I want. I have a vague list of quilts I'd like to make this year, but I'm not setting any goals per se. Instead, I might pick one or two projects I want to work on each week, and leave it at that. No stress this year!

That said, I did sign up for the One Project a Month Challenge. I've done it the last two years and not been completely successful; but I had fun, so I signed up again this year. The rules are here, if you're interested, and the list of participants is limited to 200. They may be close to that limit now. That's not to say you can't still do it on your own. In fact, that's what I did last year because I didn't make the sign up in time. That's it! That's my only goal this year!

Saturday, January 1, 2011

Happy New Year

Goodbye to 2010 and hello 2011. Although my husband and I have been to the occasional New Year's Eve party, New Year's is not generally a holiday we celebrate. In fact I think I went to bed last night around 10:00 because I am still doing battle with a cold and laryngitis.

This morning we had fried dough for breakfast. We only have it once a year on Christmas Day, but my son worked Christmas Day so we had brunch at the restaurant where he works. When we were kids, my dad made fried dough every Christmas morning for us for as long as I can remember. I never had it or saw anywhere else until my husband and I moved up to Maine. We discovered they sold it at the local fairs up here. My folks were from Maine, but I don't know if this is strictly a local thing or not. After my dad died, my husband started making fried dough for our kids on Christmas morning. I guess someday we'll be making it for our grandkids if we ever have any.

I started sewing after breakfast this morning around 9:00 and worked straight through til about 9:00 tonight except for meals. I'd like to get the Holiday quilt done while I'm still in the holiday mood. All the blocks are done except the center medallion. All the units for the center are mostly finished, and I'm working on sewing those together. Tomorrow I'd like to finish the center medallion and maybe sew some of the sashings together. My goal is to have the top finished by the end of the week.